Showing posts with label AWI. Show all posts

Saturday, January 2, 2021

George Washington's Battles, and Rating his Troops

I’ve been reading some books about the American Revolution recently, including “The British Are Coming” (the war up to Princeton 1777) and “Valiant Ambition” (George Washington and Benedict Arnold). It stirred up some thoughts I’ve had about how to rate American troops during this war. But first, let’s look at the battles that George Washington fought. 
 

Battle

Date

Result

Long Island

8/26/1776

American defeat

Kips Bay

9/15/1776

American rout

Harlem Heights

9/16/1776

Tie

White Plains

10/28/1776

American defeat

Fort Washington

11/16/1776

American disaster

Trenton

12/25/1776

British defeat

Assunpink Creek

1/2/1777

British tactical repulse

Princeton

1/3/1777

British defeat

Brandywine

9/11/1777

American defeat

Germantown

10/4/1777

American defeat

Monmouth

6/28/1778

Tie

Yorktown siege

10/1781

British disaster


 His army fought 12 battles, 10 of them in the first two years. There were two ties, 6 American defeats (1 a disaster), 4 British defeats (1 a crushing disaster). Both ties were tonics for American morale and some still claim them as victories. 
(Some may dispute Kips Bay being on this list since the American militia routed under naval bombardment before British troops landed from their boats. A furious Washington did try to rally the troops, having to be led away by his staff when it became clear the troops would not stand. Some others may dispute Fort Washington being on the list. But the buck stopped with him and he was in overall charge when this disaster hit.) 

 After his first flurry of battles in 1776 and early 1777, Washington tended to avoid major battles with British forces. Two of his early battles nearly ended with the destruction of his army, which would have been fatal to the American cause. His escape from Brooklyn Heights in the face of the Royal Navy and his flank march around Cornwallis after Assunpink Creek were skillful and most important, lucky. Washington himself had close calls at Kips Bay and Princeton. He curbed his aggressive instincts and highly risky moves. Instead, he depended on foreign assistance and the deepening unpopularity of the war in Britain to undermine the British position. The slow strangulation of the American economy by the Royal Navy’s blockade combined with the inability of the toothless Continental Congress to properly pay and supply the army made it a race to the bottom between both sides. Assailed by France, Spain and the Netherlands, Yorktown was the final blow. 

The crushing victory at Yorktown could not have been achieved without the French. Without French troops nearly doubling the size of his army, the British would not have been hiding behind fortifications. They would have been out seeking battle. Cornwallis lost the option to sail away to safety once the French navy managed to win an extremely rare victory against the Royal Navy. Instead, he was trapped and forced to surrender his entire army, ending any real hope of Britain salvaging any territory from the 13 colonies. Britain continued for another couple years trying to hold her own against the European foes. The fighting in America dwindled to nasty raids between loyalists/Tories and patriots/Whigs. 

Washington’s military career was crowned by his quashing of the attempted coup of the Newburgh conspiracy, and then retiring and demobilizing his army. Horatio Gates had tried to supplant Washington as the leading general. He then chaired the seditious Newburgh meeting, suggesting what he would have done if he had usurped Washington’s command and managed to beat the British. One can only speculate what Benedict Arnold would have perpetrated at war’s end had he had not deserted to the British. 

The regular army Washington led went through three distinct stages. In 1776/early 1777 the Continentals enlisted for one year, some being induced to stay on for a few months after, some re-enlisting for the next phase, many heading home. These troops were not on a par with British regulars. They were brave enough, but poorly trained and equipped. Washington could depend on them to serve during the term of enlistment, whereas militia came and went on their own whim, driving Washington to distraction. He wanted an American version of the British regular army. A number of American politicians feared such an army would lead to military dictatorship a la Oliver Cromwell. They obstructed the formation of this regular army. 

The army of later 1777 had signed up for 3 years or the duration of the war and were somewhat better trained than the first group. Washington didn’t have to pull a rabbit out of his hat at the end of the year to keep the force from dissolving (as he was forced to in late 1776). During the winter of 1777-1778 Steuben taught the Continentals to effectively maneuver on the field of battle and how to use their bayonets as weapons. Finally commanding troops that could go toe to toe with British regulars, Washington only fought one battle and a siege in the next four years. He didn’t want to squander such a precious resource. 

OK, digression over and on to rating Continental troops. I will use the morale/training system from the fine old set of rules, Loose Files and American Scramble, laid out below. 

1st rate

Elite troops, grenadiers, light infantry, guards

2nd rate

Trained regular troops

3rd rate

Newly raised regulars, partisans and tougher militia

4th rate

Most militia, motivated Indian warriors

5th rate

Unmotivated Indian warriors

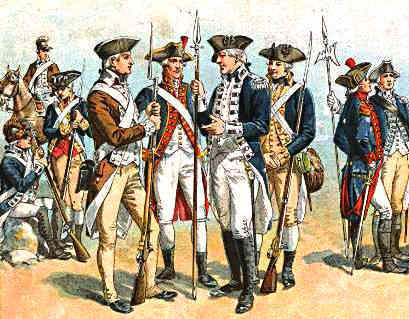
Unusually well uniformed Continentals

For the early fights around Boston, I would rate British line as 3rd rate. Urban’s “Fusiliers” said the troops were green and had not drilled, being cooped up in Boston for months. Most of the flank companies (grenadiers and light infantry) had recently been roughly handled on the retreat from Lexington. Also, they should move as Hessians since Howe's reforms were in the future. I would rate the militia at Bunker Hill  as 3rd rate, since the weak-hearted had run away  before  the  battle  started  and  those  still around were up for a fight. The militia artillery at Bunker Hill is 5th or at best 4th rate, based on their performance. For the rest of the war, American Continental artillery should be 2nd rate. 

I think the Continentals of 1775-1776 should be 3rd rate, with picked troops like light infantry 2nd rate. They should march as Hessians. Though they marched faster to and from the battlefield, being less encumbered, they were not able to maneuver in the presence of the enemy. I think this the simplest way to show this. 

The Continentals of 1777 should be a mix of 2nd and 3rd rate. They should march as Hessians, for the reasons stated above. After the hard winter of 1777-78, and Steuben’s reforms, they should basically rate as British regulars, mostly 2nd rate with picked troops 1st rate. Newly raised regulars would be 3rd rate. All should move at a good clip, faster than the Hessians. Late period Continentals should be treated as a precious resource, with serious consequences for heavy losses among them. 

My take on Indian warriors is that if they are a majority of the force and defending their tribal homelands, they count as motivated. Fighting in the woods should see them as tough opponents. If the warriors are a minority of the Crown forces, assume they are along for plunder and not interested in being cannon fodder. Consider them unmotivated. 

This last is a case of semantics, replacing the original design which deemed Indians commanded by Europeans 4th rate, otherwise 5th rate. If you prefer the earlier rationale, consider Joseph Brant as being a European commander. He was better educated and more literate than most of the militia officers he faced. And he was an effective bush tactician.

The Loose Files and American Scramble rules can be found here.

Monday, November 30, 2020

Book Review: The British Are Coming

I’ve recently finished reading Rick Atkinson’s “The British are Coming”, volume 1 of his planned trilogy on the American Revolution. I’ve read his Liberation Trilogy about the US Army in the ETO during WWII and was pleased with that. I like this too and await his next volume.

All internet images removed from this post, sorry.

Atkinson has a number of details that I’ve missed in other accounts, like British General Clinton’s talented violin playing, or the full story of the attempted attack by Bushnell’s early submarine "Turtle" in New York harbor. You can see the maps and illustrations here.  The maps are not the detailed tactical maps that we gamers crave, but they do give a better idea of the operational situation than usual in books about this war. 
 
I like the illustrations, which include a number of telling portraits of the principal characters.

'Brigadier Hugh Earl Percy, son of a duke, led a brigade from Boston to reinforce the battered British regulars retreating from Concord. “I had the happiness,” he told his father, “of saving them from inevitable destruction.” '

I got my copy from the local library. If you’re interested in this war, I recommend it. He doesn’t spend that much time on the causes of the war. For more on that topic, I heartily suggest Fred Anderson’s “Crucible of War”. This excellent history of the French and Indian War concludes with the best explanation of the break between Great Britain and the American colonies I’ve read.

Friday, September 11, 2020

Eutaw Springs 1781 III, Loose Files

One more time… this is the last Eutaw Springs game and the last Loose Files game for this year. The game ended in a complete surprise to me but I much prefer this version of the rules. I used Andy Callan’s “Paperboys Peninsular War Rules” to determine who fights in combat and how multiple unit combats are divided up. I junked the vague reference to orders a while back. Last, I tried the card activation method from the Paperboys rules. Each side has three cards in the deck, 3 red (for the British) and 3 black for the Yanks. Your first card is when you fire, the second card is when your cavalry moves, the third card is when your infantry and artillery move. Leaders can move on any card. Combat is resolved at the end of each movement phase.  Retreats and routs are done immediately after combat. After all cards are done, both sides rally. It works well. I suggest yellow markers to show a unit can't move for a turn and red for routs.

This time the deployment photo is behind the British. It must have given them a rush, for their dice were hot. And I bungled the Americans.


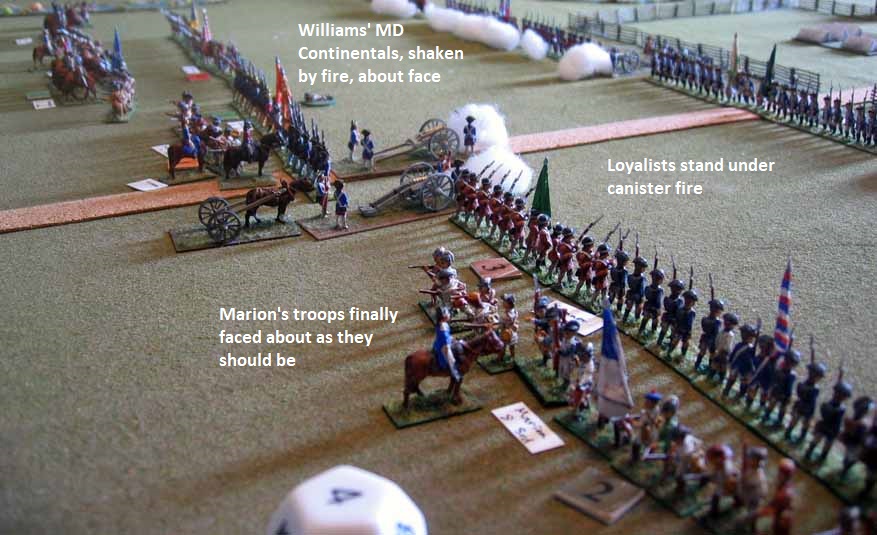
Lee’s Legion will fall back, about face and move back a little. If you pull troops out of the line to reorganize, take them all the way out. Taught myself a lesson. Pickens and Malmedy both were disorganized by musket fire and decide to fall back through the regulars.


The Maryland Continentals moved forward to cover the militia and were met by a blast of fire. They about-faced and started to move off. The British wanted to charge but could not fire and move in the same turn.


But on the next turn the British infantry move card came up first. The 3rd Foot could not fire since Williams had moved out of range, but the movement dice allowed them to charge and hit the badly disorganized Marylanders in the rear. Ouch.


On the American right, the 64th Foot charged and caught Lee’s Legion Foot reorganizing, facing the wrong way. As stated earlier, they should have fallen back further to rally. Instead they were routed. In these rules, good units routing cause infectious disorder and desertion among friends within 6”. Almost everyone who wasn’t within 6” of the Maryland rout were within 6” of Lee’s Legion. It was over. The army was a wreck.


It took about 90 minutes to play 5 turns. American losses were extremely high, 21 stands of infantry and 3 of cavalry, about 414. Many of these were either prisoners or troops who bolted due to panic. British losses? One stand of infantry in the first fight with Lee’s legion Foot. Taking into account the 400 British foragers snapped up before the battle, both sides were even but the repulse was humiliating.


In spite of this I was quite pleased with the way the rules worked. The card system removes any possible problems arising from simultaneous movement. If you’ve played such in the past, you know; “if you do this then I do that”. I recall some dreadful rows about such things. This is way better. Your card comes up, put up or shut up. Having the cavalry move on their own card makes coordination much harder. I might steal one more thing from the Paperboys rules: troops are only affected by the retreat of their own arms. So, infantry think nothing of cavalry clattering past to the rear and vice versa. But when your own sort gives way, look out.

Tuesday, September 8, 2020

Eutaw Springs II via Loose Files AAR

My last solo run of this battle got the following comment from Jeffers,

“The Firing rules confuse a lot of people. It is meant to represent long range fire only, basically long-range pot shots. Close Combat is not melee or hand to hand: it includes close range firing. It’s better to get stuck in sometimes as good quality troops will easily shake off this nonsense; close combat has a good chance of causing damage, even if you lose.”


It being well over a decade since we last used Loose Files, I decided to try the battle again with this in mind. I also put Pickens and Marion in as unit leaders (a scenario rule), and based on Novack’s OB gave the Americans a section of light artillery. A deployment map was discovered that showed Lee’s Legion foot deployed next to Marion’s militia, so that was done too. A number of events interfered with the game as will be seen below. But Jeffers’ comments were worthy of note.


Deployment and opening moves follow. 


Previously I thought Loose Files needed a few house rules. Now I think it needs clarity. Who is in combat, especially when units are different sizes in a game of linear formations? And when more than one per side is involved, what are the losses? In the case below, Marion and Lee’s Legion Foot attacked the 64th and supporting artillery. Marion’s left was within 4” (combat range) of the Loyalists. So, I included that whole unit, which skewed the odds heavily against Marion and Lee. The result was an easy victory for the Crown, get 1 DP. I gave both infantry units and the artillery section 1 DP each. The defeated loser gets 2 DPs and loses 2 casualties. Applied to both losing units, that was 4 DPs and 4 casualties. I wonder if the winners should get 1 DP only and the losers 2 DPS and casualties only. Hmm.


Pickens was hit but his boys proved that they had what it takes. 

Another lesson: don’t let enemy artillery approach to within canister range. The Loyalists are about to get hosed. 


Stuart  rallied  off  some  DPs  from  his Loyalists  but enemy  artillery  put  them right back. The Loyalists were  losing  troops to the  canister fire  and had 5 DPs,  the  maximum.  They went about and headed back into the camp looking for a respite.


At the end  of  the 6th turn  Pickens’  boys  finally threw  in  the  towel.  Both  they  and  the 3rd Foot were a wreck, with 5 DPs and numerous casualties. If Washington’s Dragoons had been in support  instead  of  wandering  around  changing  formation  and such… Williams’ Maryland Continentals were trading long range fire with Marjoribanks’ elite companies and both handing out DPs to each other. Malmedy’s NC Militia attacked the Loyalists from the rear and were held. But later  on,  I  realized  that  the  Loyalists also had two casualties that should have been part of the combat calculation. Instead of a stand-off, it should have been a success or even an easy victory for the militia. An  easy victory would have seen the militia pursue into the camp and very likely start looting.


I had stopped the game after turn 5 to prepare dinner, a grilled ribeye, roasted veggies, Bordeaux and my wife’s company. During turn 6, a dear friend called, upset over the state of the nation. It took a while to calm him. Can’t blame him.


That’s my excuse for making the combat error. Looking at it today, I didn’t have the will to figure out what to do about the error to continue and decided to write this up instead. The British center is like Swiss cheese at this point. If Campbell’s Virginia Continentals can double-time without getting too disordered, they could smash the center wide open. Again, if Washington’s Dragoons hadn’t been fiddling around. Would-a, could-a, should-a…


I played 6 turns in about 90 minutes or so, not counting the breaks for dinner and phone call. Crown losses so far were 5 stands of regulars, 3 of Loyalists, about 144 troops. Continental losses were 4 regulars, 8 militia and 2 cavalry, about 240. I really have to have a game of this whenever we get back to face to face gaming.


Again, I now feel the game needs fewer house rules and more house interpretations of the rules as written. Who is engaged in combat? And how are the penalties shared among multi-unit combats? I’ve already dispensed with orders, since they were mentioned one time and never defined. And threw out the cavalry changing speeds. The infantry doesn’t have to plan a turn in advance to attack, why should the cavalry? As it is, whenever I move cavalry, they roll a 2 and pick up disorder. Nothing in the rules, the dice gods just know.

Tuesday, September 1, 2020

Eutaw Spings 1781 AAR via Loose Files & American Scramble


Yesterday I tried out my Eutaw Springs scenario. It didn’t go as expected. While editing the photos, I mistakenly labeled the British commander as Rawdon. Oops. It was Stuart. Too late now for the photos. The deployment and opening moves follow. 


All the militia brigades were badly shot up. The British dice were better and the artillery at close range kept putting disorder points (DPs) on them. 3rd class troops (experienced militia and green regulars) cannot rally away DPs on their own. Their DPs rapidly built up to a dangerous level. Pickens turned and retreated in the nick of time. Marion waited too long.


And then on the 9th turn Greene was hit. The only Whig officer was down. Very soon after, Stuart had to roll on the risk to general table and escaped when a ball went through his cocked hat. (A house rule. Following the rules as written he would have a light wound.)


What game is complete without a cavalry charge? It led to dead horses.


It was a clear British victory, superior to the actual bloody muddle that saw the British recapture their camp from looting Americans in the actual battle. The game took slightly over 2 hours to play 12 turns. One reason it went so quickly was the British did nothing but shoot, the only movement by Stuart as he rode along the lines, rallying off the odd DP now and then.


Continentals losses (from 67 stands), 2 Continental infantry, 6 militia (another 4 ran away) and 1 cavalry stand (Lee’s Legion). My house rules for officer casualties determined that Greene was out of action for 6 weeks. British losses were negligible; that is, none, aside from Stuart’s cocked hat. American losses would be from 380 – 760 depending on if you count a removed stand as all lost or as half losses, half people helping wounded friends to the rear.


I agree that the heaviest losses in this (and most) periods occur when troops turn their backs and run while in close proximity to the enemy. But I have noted in the past that musket fire causes none in these rules until the DP level is high. Most of the British DPs were on Marjoribanks’ elite battalion, which was able to rally away 2 every turn as long as they stood still. Elite as they are, they aren’t bullet-proof. I am considering allowing 3 DP hits in a single attack to be converted into one stand lost and a DP. If that were the case Crown forces would have lost at least 3 stands even though they never got close to a dangerous DP level on any one unit.  


Units are only forced to retreat or rout by close combat, not by fire alone. Perhaps a unit that has more DPs than surviving stands should retreat in the same phase as units losing close combats. A unit with twice as many DPs routs. Last, the rules about cavalry changing speed is interesting to read but an extra thing in practice. I intend to junk it and allow cavalry to gallop from a standing start. It is simpler.


I really like the Loose Files rules and merely seek to make them clearer without making them more complex – easier to say than to do. I know the British Grenadier rules are based on Loose Files but I suspect they added a layer of complexity. I need to redo my QRS and put it in turn sequence order.


Now, on to correcting my scenario. Perhaps exceptional unit leaders should be represented. Pickens and Marion are two that come to mind. They stay with their units but can rally off a DP each turn. They are also liable to being hit like normal leaders. Nothing can be done about the British dice, which weren’t hot so much as the Continental dice were cold as ice unless shooting at the bullet-proof elites.


Further cogitation is required…


PS the new release of Blogger has some good things and some bad. If you load a group of photos the order is reversed, meaning you have to do one at a time. Previously thumbnails didn't impinge on the stuff on the right hand side of the screen. Now it does. If anyone knows how to gripe to the designers, please let me know.

Tuesday, August 25, 2020

Scenario for Eutaw Springs, Sept 8, 1781 via Loose Files & American Scramble rules

All internet images removed from this post, sorry.

April 17, 2021: scenario updated based on Buchanan's "Road to Charleston". Details below.


Cornwallis abandoned the Carolinas seeking easier pickings in Virginia. (He would find Yorktown.) Greene headed back to South Carolina to root out the garrisons left behind. British Lt. Col. Stuart offered battle at Eutaw Springs. Both armies were short of provisions. It would become clear the Americans were hungrier. Stuart sent 300 troops out to dig sweet potatoes. Greene’s army was closer than suspected. The foragers were ambushed by Continental cavalry. 60 were captured, the rest scattered until the battle was over. The remaining British and Loyalist troops hurriedly formed up west of their camp.


Greene came on in two lines, militia in the first, Continental regulars in the second with a small reserve of Washington’s Light Dragoons operating with Kirkwood’s Delaware Light Infantry company. A lengthy musket duel ended with a bayonet charge that drove the militia back. The Continentals advanced and renewed the fight. It swayed back and forth but finally most of the British broke and ran through their camp. 

 Maps can be found here and here and here.

The famished Continentals pursued into the camp and began looting food and drink. Discipline vanished in a twinkling. Marjoribanks’ elite battalion stood firm on the British right and New York Loyalists held the brick house against what few troops Greene managed to get forward. In time the British rallied, recapturing their looted camp from the disorderly Americans. Greene’s losses in killed and wounded were somewhat higher than British losses, but when the numerous prisoners taken before and during the battle are added in, Stuart smaller army lost 692 to 882 (depending on sources) to Greene’s 525 to 579. After some policing up the field, Stewart fell back towards Charleston. This was the last major engagement of the war save Yorktown. Losses on both sides were extremely heavy.


“Loose Files & American Scramble” rules call for each of my stands to represent 30 infantry, 20 cavalry or 2 guns. My collection requires 36 infantry, 24 cavalry and two guns per stand in order to avoid having any British or Hessian troops appear on the American side. As it is, Hessians will stand in for Loyalists and various other substitutions must be made. But they are all from the right war. Some units have been amalgamated for ease of play. The numbers are given below for those who wish to have a raft of tiny units alongside large ones.

 British Army. Lt. Col. Stuart DAV,4 1,343 (after losing foragers)

Units

# troops

# bases

Morale class, etc.

Royal artillery

2 6#, 1 4#, 1 3#

4 guns

2

2nd class artillery,

1 medium, 1 light

Coffin’s Loyalist Cavalry

70

6

3rd class cavalry

Marjoribanks’ (MW) Elites

281

8

1st class infantry

3rd Foot

340

9

3rd class infantry

63rd Foot

64th Foot

2/84th Foot

96

180

82

10

2nd class infantry

1st Delancey’s

New Jersey Volunteers

Provincial Light Infantry

73

66

108

7

2nd class infantry

New York Volunteers

47

1

2nd class infantry


43


Cavalry 3, artillery 2, flank companies 8, center companies 18, Tories 8

 Continental Army Major General Nathaniel Greene DAV,4 2,282

Units

# troops

# bases

Morale class, etc.

Lee’s Legion horse

Foot

120

140

5

4

2nd class cavalry

2nd class infantry

1st Continental Artillery

2 6#

2 guns

1

2nd class artillery

Washington’s Dragoons

80

3

2nd class cavalry

Kirkwood’s Delaware

80

2

1st class light infantry

SC State Cavalry

73

3

3rd class cavalry

William’s (WIA) Brigade

1st Maryland

2nd Maryland


180

180

10

2nd class infantry

Campbell’s Brigade

4th Virginia

5th Virginia


150

150

8

2nd Class infantry

Sumner’s Brigade

1st NC

2nd NC

3rd NC


120

120

120

10

3rd class infantry

Pickens’ (WIA) SC

Militia Brigade

SC State infantry

307


72

10

3rd class infantry

Marion’s SC Militia Brigade

240

8

3rd class infantry

Malmedy’s NC Militia Brigade

150

4

4th class infantry

Continental Artillery 2 3#

2 guns

1

2nd class artillery


69


Cavalry 11 art 2  Continental infantry 34 State & Militia infantry 21

 Marion’s and Pickens’ militia are rated higher due to their experience and leadership. They fought well at this battle. Technically, Kirkwood’s unit is too small for the rules but my feelings for this tiny band of heroes kept me from amalgamating them with another unit. Ditto Sheridan's NY Volunteers, who played a crucial role in the battle.

OB source: Greg Novack’s “Rise and Fight Again”.

Scenario rules: British win if less than 4 American units enter their camp. Otherwise recapturing the camp ends the game in a tie, a pyrrhic victory as in the actual battle. If the Americans capture the camp and keep it, they win a convincing and rare victory. Greene will have a much easier life after the war.

The terrain is open woods, open enough that cavalry and artillery operated freely. I would count it as open terrain and place a tree or two for visual effect. 

Any American unit that enters the camp will roll a die at the end of the turn if not in combat. On any roll less than 6 the unit starts looting and gets 1 DP. At the end of each consecutive turn, the unit will stop looting on a roll of 6 or if in combat. Add 1 to the die roll if Greene is in contact. Units looting will not fire or move. In combat they count as flanked. If forced out of the camp they stop looting.

 If Greene or Stuart are lightly wounded, they go from DAV (score of an average die) for CPs to DAV -1. Another light wound removes them from the game.

* Pickens and Marion are unit leaders. They move with their units, can rally one DP each turn or add +1 in combat. If wounded or worse they are removed from the game.

Sheridan's NY Volunteers deploy in the brick house which counts as hard cover, using the the rule below while in the house.

 Corlears Hook Fencibles House rules: after 2nd close combat stand-off in a row both sides retreat 1 average die unless defending an obstacle, fieldwork, building or fort.

 Militia units (3rd, 4th, 5th class) with 50% losses or more flee the field – remove from table. Other units (1st, 2nd class) with 75% or more losses flee. No further DP losses by friends who see this. Clears tiny remnants off the table. 

I invite comment.


Edit: 

Eutaw Springs is one of the first battles in the American Revolution I ever read a detailed account of. When a young lad, Disney had a TV series based on the wartime exploits of Francis Marion, the Swamp Fox, complete with jaunty song. In the series Marion was a handsome young fellow. He would sneak into occupied Charleston, climb up a balcony and romance the beautiful young daughter of middle-aged Banastre Tarleton. Chased, he always hid behind a tree while British cavalry galloped past. I asked my mother for a book about Francis Marion. She got me one, a young adult’s history. The book revealed that Tarleton was a young man in his twenties and Marion was in his forties and not particularly handsome. This was an early lesson about the historical accuracy of Hollywood, learned at age 10. Years after another book, The Road to Guilford Courthouse, informed me that the one time Tarleton went after Marion in earnest, Marion and his men ran all the way to North Carolina. But they did escape. Eutaw Springs was the one stand-up battle Marion and his partisans ever took part in and they acquitted themselves well. I’ve been looking to stage this for many years.