Friday, December 29, 2023

West Virginia, Lee's First Civil War Campaign

Many famous Civil War generals stumbled early in their careers, learning lessons the hard way. Robert E. Lee’s 1861 campaign in West Virginia is one. His hair hadn’t yet gone all grey. His travails in this campaign may have hastened the change, for he was all grey by 1862.


Secessionist sentiment was strongest in areas with large plantations, where the enslaved human property were the majority of the population. The small farmers of the West Virginia mountains weren’t in such a place. Many didn’t see why it was necessary to leave the Union. The locals were pro-Union or at least lukewarm about secession. Also, the Confederate command was divided. The Kanawha Valley command was spilt between two politicians turned amateur generals, John Floyd and Henry Wise.


Floyd had ample reason to fear being tried for treason if captured. As Secretary of War under the Buchanan administration before Lincoln, he was accused of shipping weapons and munitions down south, and splitting army units there into small detachments, the easier for Confederate militias to snap up when the crisis came to a head. He had also left office under a financial cloud. To round off the package, he lacked both military skill and bravery. In 1862 he would be defeated by U. S. Grant before abandoning his troops.


Henry Wise had been governor of Virginia (as had Floyd before him) and now shared command with Floyd. Wise was no great military leader. After the West Virginia campaign his forces were defeated on the North Carolina coast by Ambrose Burnside in 1862. He would in time improve into a middling quality brigade commander. Wise and Floyd despised each other, minimizing the chances of them effectively combining their forces.


In overall charge was Robert E. Lee, who had difficulty getting his fractious subordinates to work with each other or to follow his orders. Compounding this was the hostility of the local population, who instead often aided Union troops with information about roads and enemy movements.


The Kanawha campaign saw a bunch of amateurs stumble around leading green troops. Confusion reigned and casualties were low, unlike what were then considered heavy losses at Bull Run.


The Union troops were led by George McClellan, who had charge of his entire department and didn’t have to fight a rival from his own side. Union troops slowly prevailed as a result.


McClellan had some success, in large part due to his subordinate William Rosecrans. Little Mac was sent to Washington to command the Army of the Potomac, lately routed at Bull Run. Rosecrans replaced him in command in West Virginia.


After much frustration Lee finally got troops together for an attack. Like most commanders in 1861, he drew up a very complex plan. It involved six columns to drive the Union from Cheat Mountain. Amazingly, all the columns got into place as ordered. This would be a feat in the age of radios. The battle was supposed to start when the lead brigade attacked. In the rugged and wooded terrain, the lead brigadier didn’t see that the others were in place. Facing a strong position and feeling isolated, he got cold feet and didn’t attack. The other five columns waited for him to start. And waited. That and some skirmishing was the “Battle” of Cheat Mountain.


After more indecisive mucking around, Lee was recalled to Richmond. West Virginia went firmly into the Union camp. Loudly tooting his own horn, George McClellan decided that he was a military genius and Confederate inactivity was due to Lee’s caution. He continued to believe the latter until Lee proved otherwise in front of Richmond in 1862. The “Young Napoleon’s”  faith in his own genius remained, despite all evidence to the contrary.


Lee had been bested by the hostile local population, poor supply, unruly subordinates, his own overly complex plans and the Union army. Confederate troops called him “Retreating Lee”. His next task was overseeing the building of fortifications along the southern coast. Resenting hard labor deemed work for slaves, enlisted men working on the forts called him “the King of Spades”. As his hair went grey, they added “Granny Lee”. In 1862, Joe Johnston was badly wounded in front of Richmond; Davis gave command of the army to Lee, who had learned much from his sojourn in the Kanawha Valley. Soon, the uncomplimentary epithets ceased.


I have a vague idea of writing about the debut of some other Civil War generals. There may be a follow up, there may not.

Wednesday, December 6, 2023

Quatre Bras III - Bloody Big Battles (or mid-sized)

Here’s the tale of our third game test for our Quatre Bras scenario. Third time’s the charm.


Jay missed our last meeting. He got a crack at our new scenario in a hastily arranged game with Bill as his chief of staff. Jay had the reins but relied on suggestions from the less engaged Bill. It was a better command arrangement than the divided command of our last game. Jay decided before to take the role of Wellington. The French deploy first, so they were already set up. We started just before 10:30. Bill was delayed searching for a parking spot. He arrived shortly after the battle began. Allied units are in Italics. Yellow discs = disruption, blue markers = spent units, yellow arrows = retreats, red arrows = attacks and exploitation. Stars = objectives, red for allied held, blue for French held.


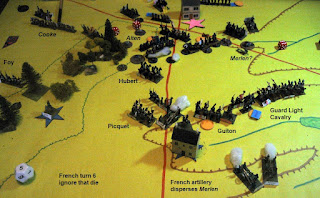
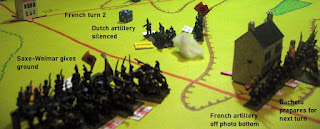
My movement dice lit up and everyone fell on Picton. He disrupted Bachelu’s advance but failed to stop the veterans from closing. Badly outnumbered and shot up by offensive fire, Picton fell back spent. Things looked grim for the Allies. During this extremely busy turn, I wandered into the kitchen to check on lunch. I had a unit that could exploit but didn’t think it could affect an assault that wasn’t yet resolved. When I returned, Jay had consulted the rules and found that exploiting units can indeed do so. This was yet another of Picton’s woes. I returned the gentlemanly assistance a bit later but don’t recall which rule was specified or what turn I it was. On the right of the photo the Guard light cavalry can be seen hunkering in a valley to avoid being artillery targets. There are restrictions on their use since Napoleon had warned Ney not to get them shot up. But they did a reasonable job of covering my right flank since Jay wasn’t interested in moving forward and releasing elite cavalry.


We broke for lunch. Jay and Bill hadn’t seen each other in a while; it was a leisurely lunch. Then we discovered that Bill had somehow missed Warren Zevon, so we went to the PC and played some of Zevon’s work. Then we resumed play. The Brunswick horse and foot arrived and put in a smashing counterattack, aided by Kruse.


Again, decent movement dice allowed me to put together a fairly coordinated attack and Brunswick was sent to the north edge of the table, spent. Bachelu attempted to take Quatre Bras on the hop but was bounced by Best’s Landwehr. Soye chased off Dutch-Belgian artillery.


The center fell into stasis; there aren’t many French infantry and many of them were battered.

Jay always plays with victory conditions firmly in mind. I am a tad blood-thirsty and channeled Ney. This would cost me.


Alten and every unspent unit charged in the center and sent the French reeling back. In the upper left hand corner of the photo, Cooke’s artillery can be seen firing into the flank of Wathiez’s chasseur brigade. They got a hit and dispersed the brigade. Should have kept the cavalry back. Sigh.


My artillery returned the favor against Merlen’s Dutch cavalry. Reille can be seen on the left most objective, sans escort. Another dicey idea. But wait, there’s more.

Alten’s attack nullified Bauduin’s zone of control, allowing the Brunswick cavalry to ride into a spot deep in my left center. I figured my cavalry would swat them away. Alten had a modest win but the real damage was done before the assault was resolved.


I thought I’d taken photos of turn 7 but apparently not.

On my French turn, Baudin supported by Picquet’s cuirassiers attacked Alten. Guiton’s cuirassiers rode out to strike Alten’s flank but were shot down by musketry from Best and flanking artillery fire from Brunswick artillery, a foolish mistake. Bauduin’s charge was halted by musket fire. Hubert’s chasseurs charged the Brunswick cavalry but were repulsed. Reille was alone in the woods at the objective in the Bois de Bossu, another mistake. On the Allied turn, the Brunswick cavalry had a healthy movement roll. They rallied off the disruption from the cavalry fight and got a full move. They marched into the woods, captured the objective and overran Reille. Night fell after turn 7, ending the game.


French losses were 6 infantry bases, 2 ran off, 2 cavalry, 2 ran off, and Reille for 7 Allied points.

Allied losses were 7 infantry, 2 ran off, 2 cavalry, 1 ran off and 1 artillery, 1 ran off for 7 French points.

The French held Gemioncourt for 1, plus 7 = 8 points.

The Allies held Quatre Bras and Bois de Bossu for 2, plus 7 = 9 points and the razor-thin win.


My rough estimate of losses, French lost 3,000 infantry, 500 cavalry and a corps CO.

The Allies lost 3,500 infantry, 500 cavalry and 12 guns.


It took us about 4 hours to play 7 turns, but we weren’t in a hurry and returned to the rule book a few times, clarifying rules not often used, like the exploitation into a standing assault and others.


We had a fine time. Jay was very happy with the scenario. He also found a couple typos, including one where the Marshal was spelled Nay. I think it’s a fun scenario and doesn’t use more than a couple Napoleonic rule mods. It’s ready for prime time with just cosmetic changes.


It occurs to me that more assaults strike home in early periods since fewer attacks get stopped by small arms fire. Amazing how the obvious can hide in plain sight.

Tuesday, November 28, 2023

Napoleon

The recently seen spectacular film, based (loosely) on real events, inspired me to write my own take of the Corsican. This will be about his generalship rather than his value (or lack of) to the human race. I will steer clear of his love life with Josephine or any of his other paramours.


His tactics were aggressive and usually competent. His victories were often more due to the way he had forced the enemy into battle. See below. Borodino and Waterloo are examples of his use of aggressive and not so competent tactics.


He was exceptional at operational strategy, the planning of movement to bring the enemy to battle on his terms. This was his strongest suit. He was a predator, viewing opposing armies as prey. Most other generals aimed to force the enemy to retreat by threatening strategic points. Napoleon always aimed to wipe them out. He didn’t annihilate them that often but quite often beat them badly while seeking their total destruction. He often won by using speed to force his enemy to fight at a disadvantage.


“There are many good generals in Europe, but they see too many things; as for me, I see only masses. I seek to destroy them, knowing well that the accessories will then fall of their own accord.” Napoleon


His operational genius led him to make grand strategic errors based on the belief that his armies were invincible. He would have been better off leaving  Spain alone in 1808, even more so, Russia in 1812. His armies were very tough, but not invincible.


Much of his success was due to his energy and his attention to detail. He was a dynamo, providing much of his own staff work. Later in his career his energy level slackened, possibly due to failing health. This coincided with his enemies learning his ways. 1809 was his last hurrah. He was still up to herculean bursts of energy, though his army was starting to show the wear and tear of nearly constant attrition.

In 1813 the Allies came up with the Trachenberg Plan. Any army facing Napoleon in person would retreat. Any facing other French generals would attack. It worked, with a few misfires. Napoleon was finally cornered at Leipzig and very badly outnumbered.


Edit: one reader pointed out on another forum that Napoleon could have retreated before Leipzig. Rather than acknowledging defeat, he threw the dice hoping for a long shot win. He was a gambler. At Waterloo he should have broken off the battle once he learned of Blucher marching against his flank. Instead of accepting defeat he rolled the dice again and again was decisively defeated.


On the first day of the Waterloo campaign, his offensive was stalling near Charleroi. He arrived and fired up the attack. The Prussians were soon retreating. Then Napoleon sat down on a chair and fell asleep. French troops were told not to cheer to avoid waking him as they marched past. This was not the Napoleon of old. A series of blunders followed during the short campaign.


“A man has his day in war as in other things. I myself shall be good for another six years, after which even I shall have to stop.” Napoleon, 1805


In most of our games, centered on individual battles, we only rate commanders (if at all) on tactical ability. Operational skill doesn’t enter into it, not to mention grand strategy.


We might also consider the morale effect of successful generals on their troops. French soldiers fought harder when Napoleon was in the field, as did British led by Wellington or Prussians led by Blucher.


“I used to say of him [Napoleon] that his presence on the field made the difference of forty thousand men.”  Wellington

Wednesday, November 22, 2023

Korean War: Thanksgiving Turkey Shoot, 1952

Another of my father-in-law’s stories of his time in the Korean War. He was a 2nd lieutenant commanding the 75 mm recoilless rifle platoon of the heavy weapons company, Company D, 23rd Infantry Regiment, 2nd Division. It was in the front line trenches on a hill facing enemy trenches across a valley. My notes are in italics, all else is in his own words.


November 22, 1952  The Turkey Shoot. 71 years ago.


During the Korean War,  we had saved up ammo for an old fashioned Turkey Shoot.  For us, that was a TOT (Time on Target exercise).  At a given moment, first the 8 inch (203 mm) guns of DIVATY (Div Artillery) miles back opened up,

 then the 155 mm (6 inch),


next  the 105 mm (4.1 inch) Howitzers, 

followed by the 4.2 inch (106 mm)


and 81 mm (3.2 inch) mortars,


the quad 50's (four 50 caliber machine guns in the back of a halftrack).


The quad 50's were firing from indirect positions dug in along the hillside behind us. They sent long streams of tracer bullets arching about 150 feet over our heads. The impact, about a mile away,  was in a well peppered 50-yard circle. 

Then all the  weapons on line opened up, tanks,

my 75's,

heavy and light machine guns.


All shells set to arrive on target at the same time, and continue firing  for  five minutes.

I assume those surviving on the receiving end scrambled out of their bunkers to line the trenches when the barrage lifted, fearing that an infantry attack was coming on the heels of the barrage.

Tuesday, November 21, 2023

Quatre Bras redux

We tested my Quatre Bras scenario for Bloody Big Battles again, with 4 Fencibles present, the first time we’ve had that many since early 2020. Bill and Carl handled Wellington’s polyglot forces. Andrew channeled Marshal Ney. I assisted with the rules, knowing when Andrew left before the game was over, I would take the French. The scenario needs some more work but is closer to done than last time. I do need to give the victory condition more thought. And tidy up the scenario.


I rated the French as veterans. This was the best French army Napoleon had led in years. They kept fighting against heavy odds here and at Waterloo where they finally broke, called upon to do more than was possible. The Anglo-Dutch were a mix of some very good troops, some OK and some not so good. The opening deployment is below.

Andrew, an aggressive player, was a good choice for Marshall Ney. He had the Allied players worried for a while. Yellow discs = disrupted units, casualty figures show where a base was lost.


The third turn saw astounding French attacks, and a bloody counter-attack by Brunswick. When it ended both Brunswick and Bachelu’s veteran units were wrecked. 


Somewhere during the brawl, Kellermann’s cuirassiers got into the fight. One division was shot up by artillery. The other got into a fight with Merlen’s larger but lesser Dutch-Belgian cavalry and was dispersed in a tie. Merlen did the same to another French cavalry unit last game. Hmm. Merlen was then sent to the showers by musket fire from Bachelu. I can’t quite place it in the photos.

We played the game Saturday. I didn’t get around to doing the report until today, Tuesday. I can’t quite reconstruct all that went down. The Allied losses were substantially higher until late in the game when all their reinforcements got into the fray. Andrew left with the Allies in a pickle. I took over as the tables turned. 


Jerome’s largest brigade was destroyed. An amazing firing squad was arranged for Foy, 20+ fire factors. Their powder must have been wet. Carl rolled a 3 on 2D6 and Foy lived to tell the tale to his children.


We played slowly. There was a lot of talking because we hadn’t been together in a while and some of the guys were rusty with the BBB rules. And the Allies displayed some indecision early on. We played 7 turns in almost 4 hours, around 30 minutes per turn. The third turn was an amazing one, with multiple combats and exploitation by the French, followed by a three-round assault by the Brunswickers. We’ve played a lot of BBB over the years but haven’t seen the like of that turn before.


French losses: 8 infantry, 1 ran away, cavalry, 3 cavalry, 3 ran away and Reille hors de combat for a total of 16. They held Gemioncourt.

The Anglo-Dutch lost 8 infantry, 1 ran away, 3 cavalry, 2 ran away for a total of 14. They held Quatre Bras and the Bois de Bossu objective.

The French score: 14 losses inflicted +1 objective = 15.

Anglo-Dutch score: 16 losses inflicted +2 objectives for a total of 18.

Wellington won. A check of the rules later showed that artillery cannot seize objectives, just infantry or cavalry. That would have made made the score close, but still Wellington’s game.

I noted that good cavalry did quite well when supporting infantry. When operating on their own, everything in the area tended to shoot at them.

About the losses: in this period I tend to think that half of game losses are dead, wounded or missing and the other half are people helping their friends to the rear or just headed that way on principle. Those who ran away would likely turn up around the camp fire at dinner time. Assuming that is true, French losses are about 4,000 infantry, 750 cavalry and a corps commander, slightly higher than the actual losses in the battle. The Anglo-Dutch losses were 4,500 infantry and 750 cavalry, slightly higher than the real thing. If it's not true, then we had an astounding bloodbath. Take your choice.

Edit: further thoughts: the French need to strike early and hard, while the iron is hot. But then they need to think about falling back slowly without flanks hanging out for the numerous Allies to envelop. If this doesn't get tested again before January, it will be March or later before the next test. Based on this scenario, Ney did a good job in the real thing.

Tuesday, November 14, 2023

A Wee Trip in the UK: Chester, Wales, Edinburgh, Orkneys, Inverness

Quite recently I traveled with my wife through the aforementioned places. Due to a bout of illness on the trip I missed the Vindolanda Fort, a mile fort on Hadrian's Wall and an active archaeological site. Next time. The really nice photos were taken by my wife, and massaged by me to reduce their sizes.


It began in Chester, a town that was first founded as the Roman fortress Deva Victrix. Later it was the HQ for Legio XX Valeria Victrix. Victrix Miniatures is based in the general vicinity. Makes sense. Our first day we got into town early in the morning after getting maybe 90 minutes of sleep on the plane. After stowing our luggage at the hotel, we staggered to Bridge Street to get some strong coffee. As we finished, loud shouting broke out on the street. Soccer fans so early? No, it was a walking tour. I knew you can get tours led either by a chap in full Roman armor or else Medieval chainmail. This was a Roman tour, with the leader shouting loudly. I didn't catch what he was saying but it sounded working class. The tourists were in a column of twos, each with a small legionary shield and a wooden sword. They responded to the leader's shouts with their own chanting, I suspect of mangled Latin. They got around the corner and out of sight before I could get a picture of them.


Chester city walls, first built by Romans and then rebuilt and expanded over the centuries. The last military use was during the English Civil Wars when Parliament blew a hole in the wall and stormed the town.


On to Wales and Conwy Castle, built by Edward I Longshanks to cow the Welsh. Mighty impressive castle on a big rock.


Skipped past Hadrian's Wall, taking the train to Edinburgh. Speaking of an impressive castle on a big rock, here's Edinburgh Castle. a Boer War monument to the Scots Greys is in the foreground.

Ensign Ewart is buried here. While still a sergeant, he captured the eagle of the 45th Ligne during the charge of the Union Brigade at Waterloo. They have the eagle and the flag in the Scots Greys museum. The flag is bleached out, no hint of the tricolor left. I have seen the King's color of the 69th Foot in the Invalides. Either the Brits had better dyes or the flag wasn't left out in the sun. There are three military museums in the castle: military, Royal Scots and Scots Greys. Yes, I was in all three. My wife is very patient.

 There is also a memorial for the Duke of York and Albany. You've heard of him.

Oh the grand old Duke of York,

He had ten thousand men,

He marched them up to the top of the hill

And he marched them down again.

The National Museum of Scotland has many fine things in the collection. One is this modern reproduction of a Celtic Carnyx. I wondered about the way it is depicted as being played straight up.


Well, a link to it being played that way is here.

Now imagine hundreds of guys around him with shields and spears.


Next we were off to Kirkwall, capital of the Orkney Islands. We got in just before air traffic was shut down by Storm Babet, which took the lives of seven people in other parts of the UK. Once it passed, weather was decent. There is a large anchorage, Scapa Flow. It was the major base for the Royal Navy in both world wars. I used to play Jutland back when I was in high school. Scapa Flow was a dot on the map where most of the Grand Fleet's dreadnoughts lived. Who knew it was so pretty?

In 1939 U-47 snuck in and torpedoed the obsolescent dreadnought Royal Oak, killing some 834 crew. What are called the Churchill Barriers were built by Italian POWs to keep other U-boats out. Kirkwall has a lovely and venerable cathedral of St. Magnus. In it is a book that has the names of those lost on the Royal Oak.


A short drive from Kirkwall is the Neolithic site of Skara Brae, 10 stone houses that would serve quite well if roofed and electrified. It was built some 5,000 years ago. There are several standing stone circles nearby, older than Stonehenge.


The gift shop has some silly items for those briefly channeling Vikings.

Nearby is the home of the local Lairds, now a museum. I found this interesting item hanging on a wall.


We took the ferry back to the Scottish mainland. I was aware that part of the time we were in the channel that Jellicoe's dreadnoughts took on their way to Jutland. I hadn't known that the populace was upset with the result of the battle and were unkind to the sailors. They didn't sink the German High Seas Fleet, but then the Germans didn't come out again during the war.

We went to Inverness, a very nice place. I have this running joke that I won't paint up Jacobite warriors for the '45 until I find tartan paint. There's a pub in Inverness called the Highlander. It had a traditional music group named... Tartan Paint. Even got us up dancing. Not right away, but I guess some Highlanders for the '45 are in my future.


On the last full day in Scotland we took a half-hour drive to Culloden. The blue flag is one of the Jacobite line markers. I'm looking across at the Duke of Cumberland's lines.

Oh, it was a lovely trip. It would have been better without the bout of illness, but c'est la vie.


PS sometimes the background and text colors of this blog drive me crazy. Hope it's readable.