Thursday, December 28, 2017

Chickamauga BBB Finale

Last session we left things hanging. Armstrong’s shot-up dismounted cavalry had suddenly caught fire and pulverized the Union left flank. There were four turns left in the game. Both sides had just had lots of cavalry arrive on the field late in the day. Would we, the Confederates be able to convert this surprise into a game-winner? Ken was unable to show. We hope he is feeling better. Rick was otherwise engaged. Jay commanded his Union troops as before, aided by Andrew, a newcomer to miniatures. I led the Confederate left, 
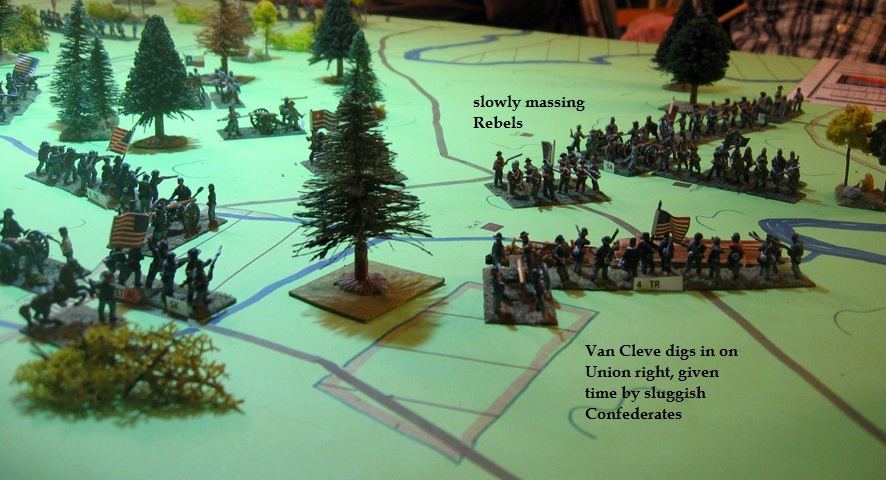
trying to tie down Union reinforcements so the right flank could break through. I did keep all save the Union cavalry from getting to that flank. That was my plan. Warning: We ran out of mounted Confederate figures and had to press 1870 French Chasseurs into service. All Confederate leaders and units are in italics.

Martin’s cavalry hit Baird’s Union troops in flank. With a middling die roll, they shoved the Yankees back.
I showed that I could roll lousy assault dice too.

Back on the Confederate right.

And our dice kept sucking.
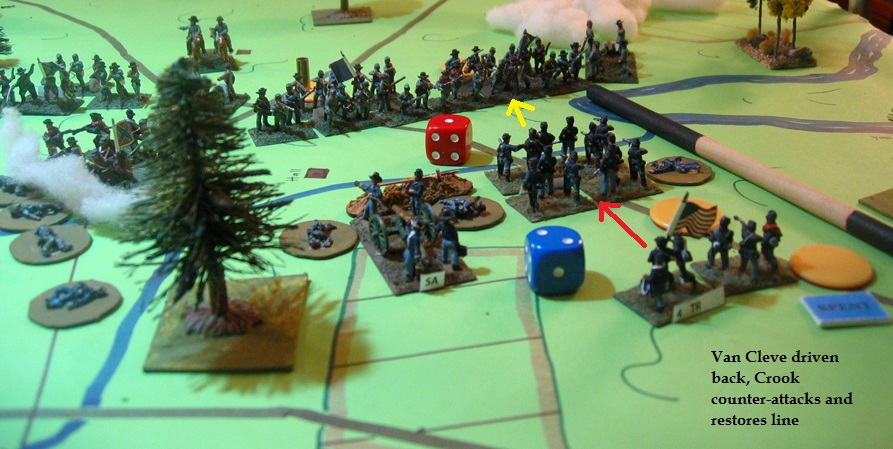
Back on my flank:
And here our troubles began.
And then one decent die roll.


We played 4 turns in 3 hours. The final result was a sanguinary tie. In total, the game lasted 7 hours. It would have gone faster if we had 2 experienced players per side but the weather and such didn’t cooperate.

Confederate losses were 15 infantry, with 5 ran away and 9 cavalry with 1 ran away, heavier losses than Bragg managed in the actual fight. Union losses were 12 infantry with 3 runaways, 3 cavalry with 1 runaway, and 1 artillery battalion. This was slightly less than the actual Union losses. All agreed it was a crackerjack game and can certainly bear replay. But next time, a couple weeks hence we will see how young General Bonaparte does along the Italian Riviera.

Both Forrest and Longstreet were hit. Our house rules determined that Forrest was seriously wounded but was back in service after a week. Longstreet’s wound wasn’t as severe; he was out of action for 4 days.

Postscript: after sleeping on it, I am amazed that we had a few actual saber charges in the woods. The sudden collapse of the Union left just as both sides got substantial cavalry reinforcements led to this most unusual spectacle. Our cavalry most often rides to the front and dismounts.

Happy New Year to all!

Friday, December 15, 2017

Chickamauga BBB again

We started a second game of Chickamauga last night, using our 15mm figures and the Bloody Big Battle rules. 5 Fencibles were to attend but Bill was sidelined by the impending arrival of contractors at his abode. Then Rick hurt his knee and we were 3. A speedy recovery is wished for Rick and may Bill’s contractors get done in a timely fashion.

I had already determined to play Braxton Bragg, practicing by arguing with myself. Jay played Rosecrans and after some equivocating Ken decided to be a Confederate. Then I briefed him on my plan. Since the game isn’t complete I won’t reveal the plan yet. It is not dead, though life-support might be next. Enough said on that for the time being.

Jay deployed Baird and Brannan back by the Lafayette road, more conservatively than my forward deployment in the last game. They soon traded fire with Forrest’s dismounted cavalry.
I rushed forward in road column to try to get across the Lafayette road before the Union line solidified. Yeah, right.

My lead elements (I commanded the Confederate left) got stopped by enemy fire.
Good movement rolls by Jay saw rifle pits dug along much of his front.
Ken responded by working around the Union left.
My lead elements were thumped. But then…


The first day was over and we played the night turn. Some of the Union rifle pits were improved to entrenchments. Negley recovered a lost stand, as did Armstrong.

 We broke for dinner. My wife made a sumptuous feast, planned because 3 of the Fencibles have birthdays around this time of year. But 2 of the birthday boys were absent. We dined anyway and had her figgy pudding for dessert. No wonder Aubrey likes the stuff. Dinner was more leisurely than usual, about 90 minutes. We finally returned to the field of combat, with a bang. Cleburne broke the Union line for a fleeting moment.


I didn’t get the picture but Johnson struck Cleburne’s right flank while Union artillery hosed down the left. Cleburne’s division quit the field, decimated. My line milled around under enemy fire. Johnson thought better of his exposed position. It was looking like we needed a miracle.

And then, on our right, Pegram attacked the Union guns frontally and was blown off the field. Armstrong’s dismounted troopers closed from the flank and overran the guns. They exploited on into Baird’s disrupted troops and whipped them too! I put a wrecked gun model down but Jay wanted the big explosion marker too, so here t’is.
We had the most unusual situation; the Union left was pretty much pulverized by a small force of dismounted cavalry. Next in line Brannan was under heavy pressure from Gist, Lidell and two artillery batteries. Wheeler’s cavalry corps had just arrived (our last reinforcements), as had Mitchell’s Union cavalry corps.
It was going to be a race. Would the Union cavalry save their mangled left or would the Confederate cavalry finish the job that Forrest started? Will they actually fight while mounted? Good gracious! We’ll have to wait until December 28 to find out as there are still 4 turns left to go. We all thought it was a crackerjack game, going down to the wire.

We played 7 turns and a night interval in 3 hours, 20 minutes. This was slower than usual since there was only one Union player. Confederate losses were 6 infantry bases gone and 2 run off, 4 cavalry bases and 1 run off, still less than actual Confederate losses in the actual battle. But then we have 4 turns to go. Union losses were 5 infantry bases gone and 1 run off, and an artillery base wiped out. It looks like it will be decided by movement dice and combat dice. When it’s over I can reveal my plan.

Wednesday, December 6, 2017

Paper mat tips

This isn’t a full-fledged tutorial on making paper mats for your games – I’m not that organized. This is about making and correcting a mat for the Bloody Big Battles scenario of the Dego campaign in 1796. The measurements of the printed map are specific to these scenarios, but the other tips are rules and game agnostic.

I have been making game mats using both canvas (more work, much prettier) and paper. First thing is to print the scenario map. I just discovered that my printer makes the squares on the map 30mm per side. Since the squares represent 12” on the table, 2.5mm = 1 inch, 5 = 2 inches, 7.5 = 3 inches, 10 = 4 inches, 12.5 = 5 inches and 15mm = 6 inches. Any feature touching the side of a 12” grid square can’t be more than 6 “ from at least one corner, making your life easier. Put small dots at the grid points on your mat. I use small green dots on the 4 foot wide green paper my wife gave me for this purpose. Measuring where streams, roads, etc. touch a map square will give a fair copy of the printed map on your mat. I tape the paper with masking tape to my table so it doesn’t slide around. Armed with the printed map, a ruler, colored markers and a glue stick, the mat making begins.
I carefully measure were a river enters a grid square and draw it on the paper, only to realize that it’s in the wrong square, too close to the top mat edge.
I used to use white-out but that leaves a really obvious mark and doesn’t take markers or paint well. Cut out scrap paper to fit the mistake. Using extra white paper to catch the overflow of glue, hit the underside of the scrap with the glue stick and press the glued paper over the mistake. Make sure the edges are pressed down firmly. The cap of the glue stick will work well for this, even better if you have a rubber roller. If you look real hard you can see the paper. You can feel it if you run your hand over it. Put some figures down, roll some dice and nobody will be the wiser.
I went back and drew the river in the right grid square.
And then went on to complete the mat.
It will be rolled up and stuck it in the closet, because the next game up is a rematch of Chickamauga on the paper mat for that. I do have Essex bicorn French command on the way for my venerable bicorn French infantry, just for the Dego campaign, and Maverick paper flags of the 1794 pattern. Close enough is good enough.

Friday, December 1, 2017

Chickamauga 1863 AAR BBB

We played the Bloody Big Battles scenario of the September 1863 battle of Chickamauga last night. Bill played Bragg, with Ken as Longstreet. I played Rosecrans with Rick as Thomas. Bill faced Rick while I faced Ken. The field is largely wooded with some clearings here and there. Most of the action would take place in the woods and most artillery would see little action. Bill started the game bemoaning having deployed Forrest’s cavalry in column, mounted. This delayed his attack.


I forwarded troops to Thomas as they arrived from the south, retaining some for my own use.
Ken’s attack was delayed by his abysmal movement dice. The odds of any one of his units not moving at all in the woods was 10 in 36. During the first day he never had more than half of his infantry moving. He didn’t want to go in piecemeal. This gave me time to get Van Cleve in position and dig rifle pits anchored on the deep Chickamauga Creek.
Things started to heat up on the Union left.
And likewise on my front.

This ended the first day. Overnight some rifle pits were dug and Palmer improved his rifle pits to entrenchments, making sure that his part of the line would be avoided by the Rebels.

We broke for our usual leisurely dinner. I think the Confederates were too cautious on the first day. They have to drive into the Union lines to win. Coordinated attacks in the woods aren’t easy. But waiting for everything to click lets the Union dig rifle pits and position artillery.

Dawn broke on the second day and things got considerably more heated.

You will note that I kept better track of what was going on in my sector. This game is a sprawling thing of many small battles, not unlike the real thing.
Stewart advanced into range of two artillery battalions which I then forgot to fire. This would cost me. Stewart’s rifle fire silenced one battery on his next defensive fire phase. My return fire from other units disrupted him. He rallied and came on as in the photo below. I was disconcerted to see Wilder routed after a very short time in combat.


Wheeler’s newly arrived cavalry attacked on foot and put heavy pressure on the Union left, which began to give way. Reserves were committed, perhaps too many. Negley was about to be needed in the center.


The game was called on account of time, with 2 turns left to play and the game up in the air. Cheatham had broken the line, in sight of objectives, nearly taking Thomas down. Could Palmer and Wood redeploy in time to stop him? We’ll never know. The crew didn’t want to leave this set up for the next session just to play 2 turns. 

We played 9 turns in 4 hours. Perhaps we could have played faster, since the first day saw less combat than the second.

Union losses: 10 infantry bases, 1 ran off and 2 artillery battalions. Confederate losses were 10 infantry bases, 1 ran off. Losses were lower than in the actual battle, which I chalk up to the quiet first day, and stopping the game with 2 turns to go.

The big question is what shall we play the next time, two weeks hence? I have a hankering to try the Rebels in this game, but Bonaparte in Italy 1796 also beckons. And there’s always another French & Indian War skirmish via Muskets and Tomahawks. We’ll see.

Two thoughts about this scenario: a minor one is I think Cleburne’s division should be rated as veteran and aggressive from Stones River until Cleburne's death at Franklin. Perhaps to balance this, rate Sheridan as veteran, though this was not one of his heroic outings. The other is perhaps with 11 turns we should plan on playing the first day (and night interval) in one session and then leave the second day for another time. 11 turns seems to be beyond our ability to complete to 3-4 hours. During the game Ken regaled us with tales of how he would blame everyone else in pamphlets after the war and claim whatever credit was available. Talk about historical accuracy!