Friday, August 20, 2021

Bath-tub Bailen Blowout, an AAR

Ok, enough with the silly alliteration. We played our bath-tub Bailen scenario last night. The game was a howler. A number of mistakes were made but we all had a fine time and finished the game, for a change. See the previous post for the scenario.


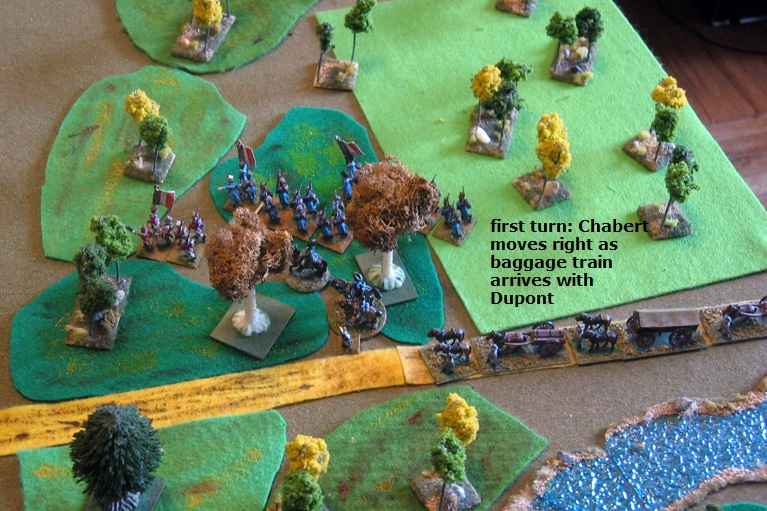
Jay, arriving first, led the Spanish as General Reding while Bill got the Spanish left as the French émigré Coupigny. I had the role of Dupont trying to smash the Spanish out of my way before the rest of the Spanish army showed up behind me. Carl showed up later and got command of the French left.


Using reserve movement (columns at a distance from the enemy), I pushed the lead French units towards the Spanish left, thinking that Coupigny’s inept status made them a target. In fact, being inept isn’t such a problem for defenders. Anyway, the dice determined that the renegade French aristocrat was alert this day.


After a battering from French skirmishers, the Spanish pulled theirs back. The French skirmishers dropped back beyond the effective musket range of formed troops and shot at the formed line, causing some hits. Nothing as irritating as being hit without being able to reply.


The action grew hotter and I forgot to take photos for a while. The Spanish skirmish screen came out again and ours charged, beating back all save the Walloon Guard skirmishers. I have a question in to the designer about what skirmish screens can do. Now some formed French battalions charged and were repulsed.


Meanwhile, on our left, Reding’s division slowly rolled forward in line (ah, those old regime forces). Carl made ready to receive them. I sent over our lone elite unit, the Marines of the Guard/converged grenadiers. They look like Old Guard grenadiers. At least they aren’t Civil War or WWII figures. There are other substitutions on the table. All are at least from the 1792 – 1815 period. But I digress.


Jay sent the skirmish screens of two Spanish regular battalions to charge Carl’s two batteries of artillery. Canister didn’t stop either attack and the gunners evaded behind their nearby Spanish “Swiss” supports (look like bicorn French). A turn later, Jay realized that they should not have been allowed to close since skirmishers aren’t allowed within 2” of formed troops. I had deployed the supports on either side of the guns, thinking that the crews could hide behind them if charged and forgot about the proximity rule. Rather than reconstruct the situation, we played on. Soon we broke for dinner and the excellent cake my wife made for dessert. And Carl's rosé. 


Carl had his two line battalions charge the Spanish regulars; his right battalion won and his left battalion failed badly. Fortunately, the Guards/grenadiers came up between the two and charged. Both sides scored numerous hits in the musket fire preceding the charge and in the ensuing close combat. When the smoke cleared, the Spanish regulars had routed, bestowing morale hits on nearby friends and causing another rout, while the French elites were pretty banged up, in need of some serious R&R.


Spanish artillery routed the Garde de Paris, (who look suspiciously like Nassau troops) putting morale hits on nearby friends. Both sides along Coupigny’s line were pretty banged up, with a number of units close to routing. French brigadier Chabert, trying to rally a French battalion in the front line, was shot and mortally wounded, calling for my wounded officer vignette. The Spanish line withdrew behind the crest. Weakened French units, unable to advance, sent their skirmishers out. Some moved up to the crest and dispatched a Spanish unit with musket fire. Meanwhile French Chasseurs a Cheval charged a Spanish militia unit (was that the New Orleans Free Men of Color?), who only scored one hit in the ensuing fracas and were routed. The Chasseurs pursued into a regular battalion that was unable to fire or change formation. Coupigny joined them.


Reding tried to rally a badly shot up battalion in the center but was chased off the field with them when they routed under skirmisher fire. At the end of the 8th turn during this furball, the Spanish rolled for the arrival of Castanos with the rest of the Spanish army behind us, needing a six to end the game. He didn’t get it. Carl and I breathed. The scrum continued. More units routed or became weakened. We counted up routed and weakened units at the end of the 9th turn. The score said 6 ½ Spanish units, counting routed (including Reding) and weakened units, which just reached the Spanish break point, while French Losses were 5, 1 away from ours. We had broken through. Good thing they ran away, or else we would have had to.


We asked Bill (Jay had to leave a little earlier) to roll and see if Castanos appeared, needing a 4, 5 or 6. He got it and we knew just how close the game had been. Later, while taking photos of the end game, I discovered that we had left a routed French unit on the table, marked as weakened, so French losses were actually 5 ½, just a half unit from breaking. A Spanish volunteer unit on the table wasn’t marked as weakened, but had enough hits to warrant that status. That put the Spanish losses up to 7, a half point over the line.  The remaining photos are all of the end game.


I have to figure that Vedel would show up behind Reding’s force and make the retreat problematic, while Castanos would beat up the French baggage train and any others who were too slow to get out of the way. Napoleon would not be pleased with the result, but it was certainly better than having a French corps surrender, as in the actual battle. I think we played 9 turns in 3 hours, 30  minutes, though I forgot to note the time we began playing the last turn. It was the rosé.


A couple things: in future games, when a unit is routed, we need to mark it with a red disc (flip over the yellow ones we use to show weakened units) and make sure morale hits are marked before removing them from the table. Also, the skirmish screens of half strength units should be indicated by single figures.


As for the things done by our skirmishers, questions are in to Keith Flint, the designer. He will let us know if we did the right thing. Among our mistakes: forgot the Spanish get -1 for initiative rolls, skirmishers getting within 2" of formed troops, probably some others.

Edit: Keith got back to us. Weakened units can only send skirmish screens closer to the enemy if a general is attached to the parent unit. And he reiterated that the charge against artillery was negated by the presence of formed troops. Live and learn.


MAJOR EDIT: from the rules: Generals attached to a routing unit remain on the table and are moved back 6” along the line of initial retreat.

In our reduced 15mm scale, that would be 4". The upshot is that Spanish losses at the end of the 9th turn were 6, half a unit shy of their breakpoint, since Reding did not rout off the table. Castanos' two divisions and the raiders arrived. The French threw down their weapons as in the real battle and all went into captivity, giving Napoleon apoplexy.


I still like the full size Bailen scenario but can see it will not be playable in an evening. Well, I can look at it. 


Bill, having had two battalions beat up by a light cavalry unit, opined that cavalry are too strong. I think the answer is forming square, which no one has yet done in any of our games. That said, I downgraded the French cavalry to provisional in this scenario since they come equipped with generals, who give a bonus in combat and can rally off hits. I did want them better than the Spanish cavalry who lacked decent horses. The French rode down some infantry at the real battle. Anyway, we like these rules and will continue to use them. The Fencibles are out of action after this until late September or early October. Real Life (gasp) intrudes and puts a damper on our 19th Century follies. We'll be back (in Ahnold  Terminator accent).


Saturday, August 14, 2021

Bath Tub Bailen - a scenario for Shadows of the Eagles

You've heard of bath-tub gin? Here's a bath-tub battle. I shaved the two sides down by about half to make a game we can finish next week in 2 - 3 hours. Bailen, July 19, 1808 was the unforseen French disaster that rocked Napoleon's plans in Spain. 

                                                    
                                                                The Emperor

Introduction  

The Emperor Napoleon defeated the Austrians at Ulm and Austerlitz in 1805, crushed the Prussians at Jena-Auerstadt in 1806 and forced the Russians to accept his dominance of Europe in 1807 after defeating them at Friedland. He dismantled the Holy Roman Empire of 300+ states, replacing it with the 13 states of the Confederation of the Rhine, all beholden to the French Empire.


In 1808, deciding to depose his incompetent Spanish Bourbon allies, he exploited their internal feud, convinced the King to abdicate in favor of his son, then kidnapped the son and finally installed his brother Joseph Bonaparte on the throne. Presented with this astonishing scam, the Madrid populace rose up against their usurped central government in May. Against ferocious repression, the disjointed revolt gathered steam. By July most of the country was in rebellion. Those unfortunate Spanish who had thrown in their lot with the French were liable to be lynched.


                                                        Dos de Mayo, by Goya

Pierre Dupont and his French corps were stranded in Andalusia, southern Spain. The countryside and many elements of the Royal Spanish Army were in arms against him. Dupont had been a valiant and tough division commander, but independent command was a step too far. Many of his troops were second-rate, the sweepings of depots, along with some Spanish Royal Army troops that had not yet joined the revolt. He was opposed by Francisco Castanos and a larger Spanish force. Napoleon had assessed the Bourbons well but had badly under-estimated the Spanish populace. This was his first major blunder. The next would follow in 4 years when he invaded Russia.


Both sides divided their forces and stumbled around in a deadly game of blind man’s bluff. Castanos’ subordinate, the Swiss General Teodoro Reding fell on a small French division, crushing it with overwhelming numbers. More blind stumbling followed. The situation just before the battle, west to east was: Castanos' two divisions at Andujar, Dupont with a reinforced division further east on the road to Bailen, Reding's two Spanish divisions at Bailen and French general Vedel furthest east, vainly seeking the Spanish. Dupont had finally realized that he was in trouble and was trying to retreat east, to reach the mountain pass through the Sierra Morena that would put him back in touch with French-occupied Madrid. Most of these forces had only the dimmest notion where the others were.


                                      General Teodoro Reding

Spanish briefing: You routed a small French force here some days back and then rested your troops. Dust clouds indicate many troops are approaching from the west. Is it the French, or your superior Castanos? Your orders are to wait for him and unite here. There is a strong French force somewhere behind you. You control the best source of fresh water for several miles on this hot, dry day.

 Spanish -1 on initiative rolls.

Units of the Army of Andalusia Spanish CO Reding capable 13,573, 13 units, breakpoint 6 ½ 

Reding’s 1st division 7,849

1st Division Vanguard (right) Brigadier Venegas capable

                                                2 inferior volunteer infantry battalions

                                                1 regular battalion

                                                1 inferior light cavalry regiment


1st Division Center Reding

                                                3 regular infantry battalions

                                                1 regular artillery battery


2nd Division Coupigny inept   

 5,724                                      ½ elite infantry battalion (Walloon Guards)

                                                1 provisional militia battalion

                                                3 regular infantry battalions (1 is Swiss Rgt Reding)

                                                ½ inferior light cavalry regiment


1st Division deploys on Zumacar Grande, north of the road from the bridge.

2nd Division deploys south of the road and on El Cerrajon.


                                                          General Pierre Dupont

French briefing: Tired and thirsty, your troops have been marching all night to escape from Castanos’ army at Andujar. Many of them have a touch of the runs. Your baggage train is full of loot from Cordoba and soldiers too sick to march. Vedel’s strong division was sent to clear your line of retreat a few days back. No sign of him since. Your advance unit reports the hills east of the nearly dry River Rumblar are lined with troops. They don’t look French. Where is Vedel? How close is Castanos behind you? It’s a little late to send out scouts. Anyway, the Spanish will not stand against Imperial French troops.

 French +1 on initiative rolls, negated by Duponts inept status.

2nd Armee d’Observation de la Gironde, CO Dupont (WIA), inept      10,581

1 elite infantry, 1 ½ regular, 5 provisional infantry, 1 HC, 1 LC, 2 Art, 11 ½ units, breakpoint 6

Brigade Chabert capable      deploy in road column on road from bridge              

            ½ regular Swiss battalion

2 Provisional Reserve Battalions

Baggage convoy 3 inferior wagons enter turn 1 with Dupont

Brigade Schramm (WIA) capable enter turn 2 

        2 Provisional Spanish Swiss battalions

        1 battery regular artillery

Brigade Pannetier capable enter turn 3          

        1 regular Garde de Paris battalion

        1 provisional Reserve battalion

        1 battery regular artillery

Brigade Dupre (KIA) capable enter turn 3      

        1 provisonal* light cavalry regiment

Brigade Prive capable enter turn 4        

        1 provisional* heavy cavalry regiment

Marines of the Guard/Converged Grenadiers enter turn 4

        1 elite independent infantry battalion

* after playing a game, it seems right to downgrade the French cavalry from regular to provisional, since they were ad-hoc collections of depot units. Attached generals make them better than the Spanish cavalry.

French reinforcements enter in road column from the Rumblar bridge.


Special rules: due to the scale of the game (each battalion represents two, etc.) artillery may not fire at extreme range. Wagons do not fight but count as losses if weakened or routed. If and when the provisional units in Schramm’s brigade acquire 6 hits each, they are assumed to have defected to the Spanish and cease to exist as units. The effects on other French units within 4 inches is to take a hit, just as if these units routed. At the end of turn 8, Castanos appears behind the French and the game ends on a roll of 6. Otherwise the end of turn 9 on a roll of 4+, end of turn 10 on 2+, and automatically end of turn 11 if not before.


The Spanish troops are all Old Regime (change formation slowly, etc.), as are the Spanish infantry in Schramm's Brigade. All other French troops are new Regime. Provisional troops on either side count as regular for training, inferior for motivation. Spanish regular and provincial infantry have inferior skirmish screens. Olive groves count as difficult terrain for cavalry. Hills are gentle. No preliminary bombardment. 

Victory: If the French have 6+ units that have exited or can exit the east edge of the board without colliding with Spanish infantry, they win. If either side breaks the other, they win. If both break the game is a tie. Any other result is the historical one, a strategic Spanish victory.

Historical result: the French made three disjointed attacks on the Spanish position. Each failed, though French cavalry rode down some units. As the last attack failed, Dupont’s Spanish “Swiss” battalions defected, several thousand enemy irregulars led by the energetic Colonel Cruz-Murgeon descended from the north to loot the baggage, and Castanos’ lead units struck the French rear. Dupont threw in the towel and began negotiating with Castanos. Vedel belatedly appeared and roughed up the Spanish rear guard before being ordered to desist by Dupont. Dupont ended up surrendering his forces and also Vedel’s division, which could have escaped to Madrid. Napoleon was not pleased.


                                                         The capitulation

The capture of a French corps sent Spanish morale soaring. The unbroken string of French victories since 1805 had been tarnished. The Habsburgs were encouraged and began planning their 1809 war against Napoleon. They were aghast at his overthrow of an allied dynasty, fearing what he had in store for them. Britain, officially at war with Spain for years, began casting about for ways to fish in the troubled Iberian waters. Bailen also led the Spanish to try to reproduce the strategy that led to the famous victory. It would be found wanting against commanders more competent than Dupont. The war in the Peninsula dragged on for six years, and saw Great Britain intervene. Between the various Spanish armies and Wellngton's British-Portuguese, several hundred thousand Imperial troops were tied down in a brutal and fruitless struggle.


This fairly small battle had rather large results.


Game notes: The game ends when Castanos and the irregulars appear, it being assumed that if the French haven’t broken through by then they will capitulate. Vedel’s tardy arrival is treated as beside the point here, as it was in the real thing. The Spanish rearguard (under Colonel Nacten) that faced him is off the table to the west and not available for use.

The only part of this scenario I have reservations about (so far) is the timing for ending the game. That might change. The proof will be in the playing.


Source: Battle Studies in the Peninsula May 1808 – January 1809 by Richard Partridge and Michael Oliver, Constable, London 1988.


This is THE source for the Spanish Army of this time and the battles of the early Peninsular War. If you are interested in this period and army, this book is a must. The authors are wargamers and each battle description has ideas about gaming those battles. It includes maps, orders of battles and brief bios of commanders. Some copies are available on Amazon, hopefully other sources too. This scenario is heavily based on their description.

Friday, August 13, 2021

Shadow of the Eagles, Control the River

We played the second scenario from the Shadows of the Eagles rules last evening. We didn’t finish the game. The novelty of getting together in person instead of Zooming generates a lot of conversation, much of it non game related. It was still a fun gathering. I think I need to cut down the size of my planned Bailen scenario next week so we have a shot at completing it.


Set in 1813, Jay had the French with 3 regular battalions, 3 provisional (depot regulars) battalions and 3 conscript (inferior) battalions plus cavalry and artillery. He opted to have mixed brigades with one of each type. Instead my Prussians had a regiment of regulars, another of reserves (provisional) and 1 of Landwehr, plus cavalry and artillery.


The river had two bridges, each near a town, a ford in the north and one in the southwest. The bridges and towns were each worth two enemy units routed if the French captured them (or the Prussians re-took them) and the northern ford was worth one. Two of the Prussian infantry regiments and the dragoon brigade would arrive as reinforcements, determined by die rolls. It turns out one would arrive on the first turn, another on the second and the regular infantry on the third turn. When we rolled for brigadiers, the French got one inspired infantry brigadier. We got (in addition to the inept CO), an inept infantry brigadier and another to lead the dragoon brigade. The last did OK, being more active than we expected. As for the infantry one, having inept generals is not as bad when defending.  


A French infantry brigade headed for each bridge and one for the northern ford. The heavy cavalry brigade started fording the southwestern ford, a lengthy undertaking. The light cavalry brigade headed for the eastern bridge. Carl took the Prussian left, which had an independent reserve infantry fusilier battalion and a light cavalry brigade. Arriving on the first turn was a dragoon brigade with an elite horse artillery battery.


A French battalion surged onto the bridge in front of our left and was savaged by musket fire, becoming weakened (yellow disc). It did capture the bridge. Another battalion made ready to attack the bridge on our right but was weakened by artillery and musket fire.


We broke for dinner and more discussion.


Jay had to head home. Offered command of either the French or the Prussians, Carl opted to stay on the defense. I shifted to the French side of the table and adjusted my attitude. Rebuffed on both flanks, the center brigade deployed into columns with a cloud of skirmishers in front and advanced.


It was getting late. Carl suggested we play a turn without movement and just fire again. So we did. Two Prussian units were broken by fire. One French unit I was sure would be broken breathed a sigh of relief when Prussian artillery went high. We were even on points. Each side lost two points, the Prussians because a bridge was taken and the French because it was recaptured. The French had a unit routed and 3 weakened, for another 2.5, making a total of 4.5 towards the French breakpoint of 7.5. The Prussians had two units touted and one weakened for another 2.5, again a total of 4.5 towards their breakpoint of 8. While close, so far the river line was intact, save for the French heavy cavalry brigade which was almost entirely across.


We played 4 and a partial 5th turns in a little over two hours. I’m sure we can play more quickly but the banter and such is too good to pass up. We all like the rules. But I do have to down-size that Bailen scenario…


Friday, August 6, 2021

Shadow of the Eagles: Anatomy of a Cavalry Charge

There has been discussion of the power (or presumed lack thereof) of cavalry in the new Napoleonic rules Shadow of the Eagles. I decided a close look at a cavalry charge in our most recent game (see the previous post) might help explain how the rules worked. The success of this charge surprised me. The French player’s dice went cold. But the Prussian cavalry would have succeeded unless the French dice were smoking. If the French dice hadn’t been so cold the Prussian Dragoons would have been in considerably worse shape afterwards and likely unable to exploit any further, though another fresh unit was coming along. All in all, not bad for routing two battalions in a frontal charge.


The situation before the charge saw a regular French light infantry battalion in line with three hits from previous artillery fire. One more hit would make them weakened, with negative modifiers on both firing and close combat dice. Near their left rear was a battalion of provisional light infantry, with regular training but poor motivation. This last was a negative modifier in close combat, and the unit took one less hit before becoming weakened or routing. The provisional battalion had no hits yet.


Carl, having just arrived mid-game and a newbie at Napoleonic gaming, decided to charge with his leading fresh Prussian dragon regiment, the other following up to the left rear. I asked him if he wanted his brigadier to lead the charge. Informed that this would give him a plus in close combat but risk the loss of the leader, he hesitated but then threw the brigadier into the fray.


The French fired at the charge. They rolled 4 D6, needing 4+ on each to score hits. Against a fresh regular unit, they would need 4 hits to weaken the cavalry and stop the charge in its tracks. Odds called for 2 hits. They got one. The cavalry closed. Again the French rolled 4 dice, needing 4+ for hits. They scored none. The dragoons rolled 4 dice. The hit number was 4+, but they got a +1 for charging and another for the attached leader. They needed 2+ for hits. They got 3. That put the infantry at 6 hits to their 1. Close combats are won by the side with fewer hits when the smoke clears, no need to keep track of who scored more hits in the fight. The loser takes another hit and falls back. That put the battalion at 7 hits, enough to rout a regular unit. Off the table they went, putting a hit on the provisional battalion which was close enough to be affected by the rout. The dragoons moved into the battalion’s position and rolled to see if they would pursue. The dice said they had the option. Other choices would be no pursuit or mandatory pursuit. Carl chose to pursue. The dragoons rode into the provisional battalion, chasing fugitives from the first unit. The provisional battalion could not fire or take an emergency test to form square. The units were left in contact and the combat resolved on the next turn.


The French failed to hit the Prussian brigadier, a test required since the unit he was attached to had taken at least one hit. They needed 11 or 12 on 2D6 and didn’t get it.


The provisional unit’s poor motivation gave them a -1 modifier in close combat. They needed 5+ to score hits with their 4 dice and got none. The cavalry needed 2+ again on 4 dice and got hits on all 4. This put the battalion at 5 hits, losing the fight. They got one more for losing the fight which put them at 6. That was enough to rout a poorly motivated unit. Off they went and the dragoons took their position. They were unable to pursue, which spared an unsupported French battery for a turn. The French had a hole in their left center, no reserve and an unsupported battery facing the wrong way within easy reach. The French threw in the towel. The loss of the battery would put them at their break point.


If the battery passed an emergency test to pivot and fire at the charge, they could at best score 2 hits, not enough to stop the charge. In these rules gunners will flee to supports if they have them, or flee out of the game otherwise. I like this rule, since most accounts show artillerymen of the period highly sensitive about having supports.


Again, if the French player’s dice had been more cooperative, the dragoons would have been rather beaten up after this charge. But the Prussian dice weren’t all that hot, just about average. If the lead battalion had managed to score 4 hits between firing and close combat, the dragoons would have been unable to pursue into the second battalion.


The real difference was not remembering to have the first battalion test for forming square (5+ on one die for regular training). If they failed, the result would have been the same. If they changed formation, the charge would very likely have been repulsed. Cavalry against a square lose the charge bonus and get -3. Squares only break when the unit is routed.


If I ever see fresh enemy heavy cavalry approach, I won’t wait to go into square. Provided, of course, enemy infantry and/or artillery are not part of the equation. And I’ll play close attention to enemy light cavalry. They get a -1 modifier in close combat.


Disclaimer: I helped play test these rules, and like them, but have no financial interest in them.    


Edit: Carl sent the following photos and text a couple days back. I got around to posting them.

Here are a few images from a journalist who was embedded with the troops during the conflict a couple weeks ago.