Friday, December 20, 2019

Seven Years War redux, Rebels & Patriots


This a reprise of the game we last played in November (report here) using the Rebels & Patriots rules with larger units of Seven Years War 15mm troops. We used a base of 2-3 figures in place of single figures. We had a larger attendance than has been usual lately.

The game is based on the Lament Ridge scenario in the rules with a crossroads replacing the ridge. Holding the crossroads at game end is worth 3 points, causing 1/3 point loss to the enemy is worth 1, and avoiding 1/3 point loss for your own side is worth 2 points. The order of battle is listed below.

Austrians, led by General Esterhazy, a ballroom darling (can move a unit 3” extra once per game)
3 line infantry battalions (1 is Hungarian, no special rules)   
@ 4 points each
1 half battalion Grenzer skirmishers              
@ 2 points
1 squadron (small unit) shock cavalry dragoons
@ 5 points
1 squadron (small unit) shock cavalry cuirassiers
@ 5 points
1 section medium artillery
@ 6 points
Total 30 points, no special rules in this scenario for cuirassiers

Prussians, led by General Zeitgeist, wheezy (avoids going into the woods, no big deal with this force)
2 line infantry battalions
@ 4 points each
1 line infantry battalion, good shooters
@ 6 points
2 squadrons (small units) shock cavalry 
@ 5 points each
1 section medium artillery
@ 6 points
 Total 30 points

Zeitgeist earned 6 points in the last game. If he earns 14 more he may be knighted and allowed to use the von prefix. And a roll on the traits table to see if he can pick up something better than wheezy.

Bill played the Prussian Zeigeist aided by Ken. I played the Austrian Esterhazy seconded by the brothers Rick (left flank) and David (right flank). Unfortunately Jay and Andrew could not attend due to illness in their families. We all hope this is soon alleviated.

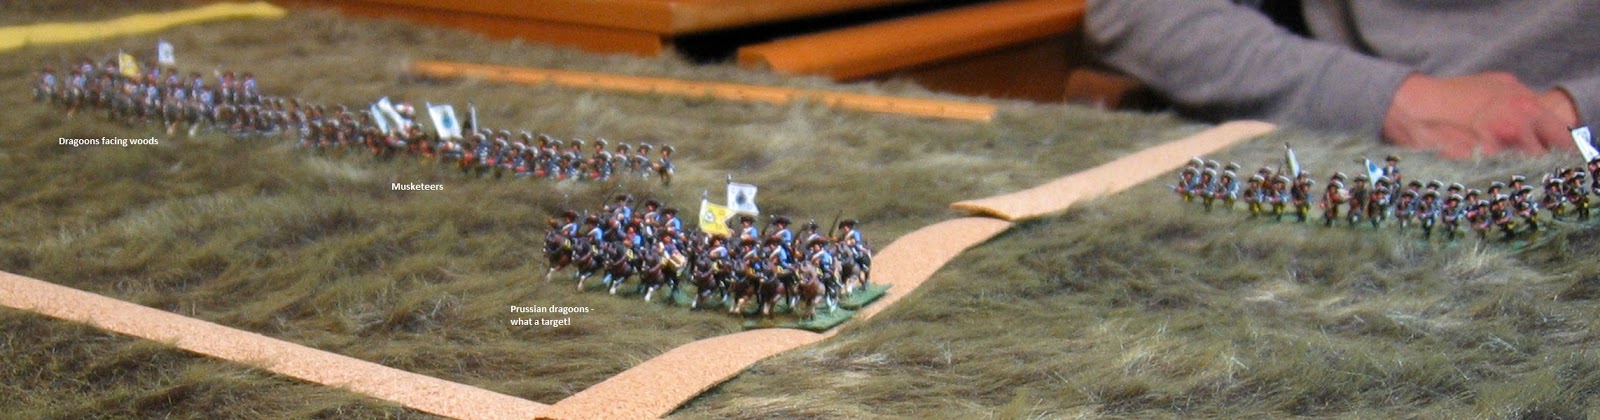
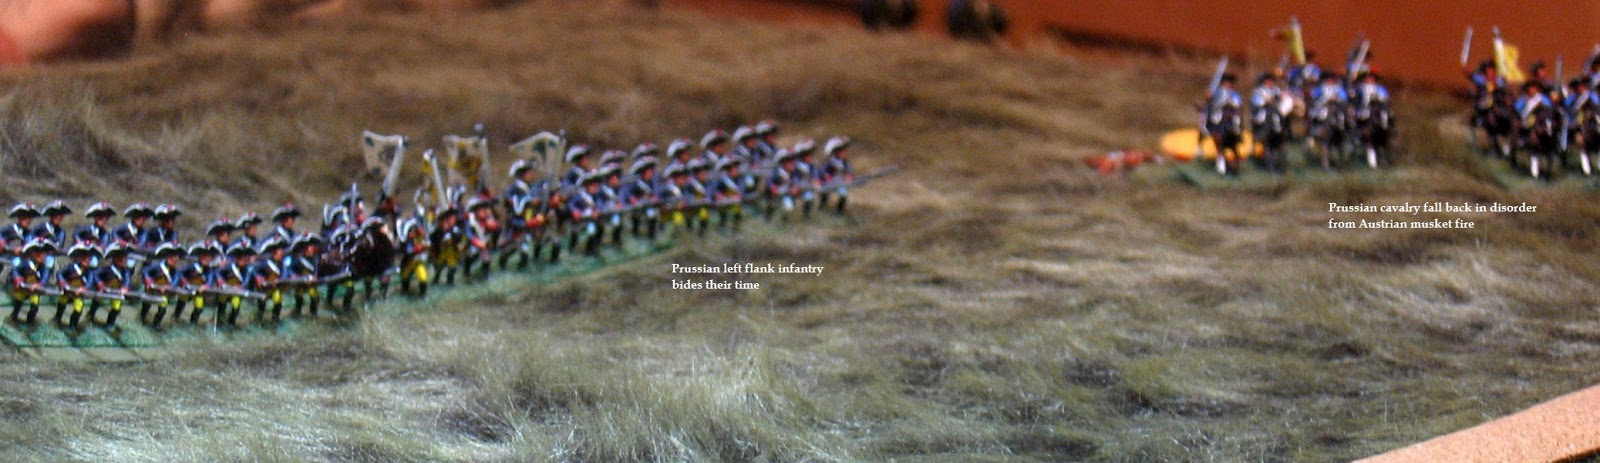
My plan was to engage with infantry and artillery, holding our left flank back since it faced the best Prussian unit, the “good shooters”. The cavalry would be in reserve and would ride out and fall on any Prussian unit that became disordered or badly shot up. I would show the guys how to lead cavalry. We’ll see how that turned out. As in the last game, Esterhazy’s trait was forgotten. I could have used the extra 3” bonus move at least once. Perhaps I’ll put my vivandiere next to him as a reminder. Now, on to the game.


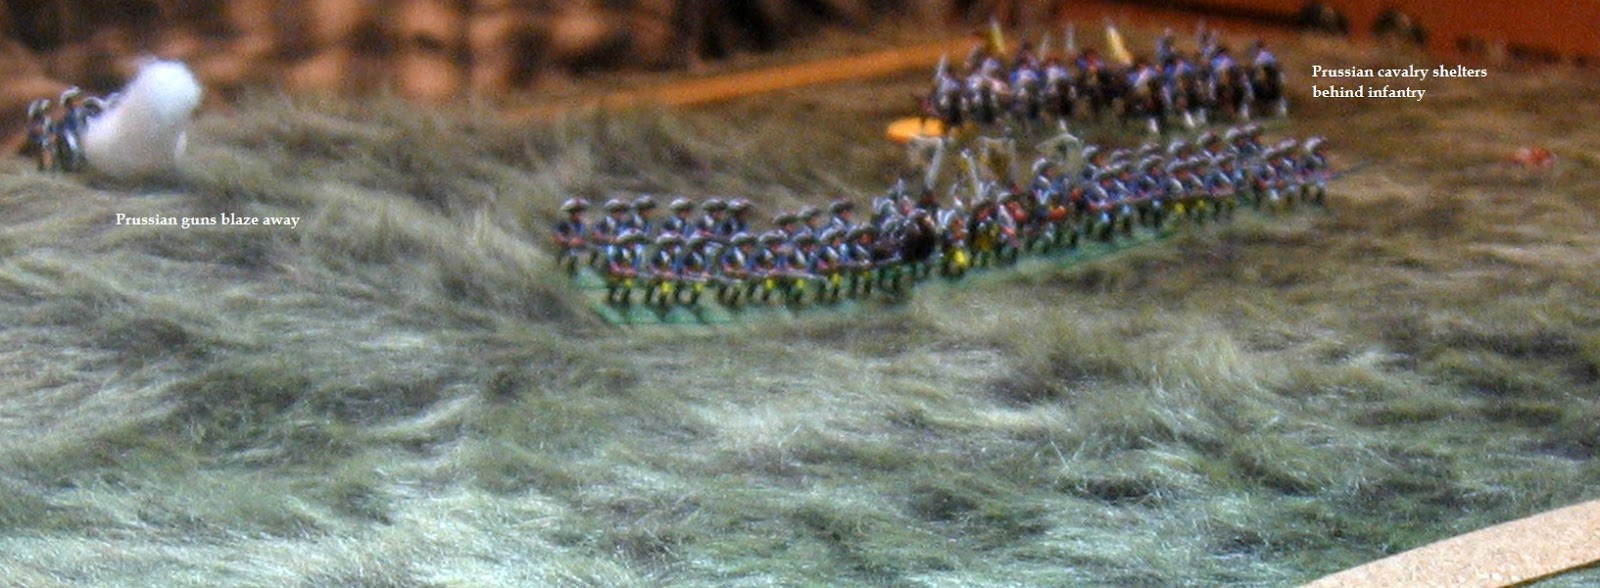
A disorder marker on left flank Prussian cavalry got my attention and I planned a strike by both squadrons of cavalry.


Then the lead squadron decided to feed their horses. Being in close order, my squadron could not pass through and tried to move around them, slowing the whole procedure.


Then the lead squadron took off and Esterhazy decided it was time to make a long speech to the troopers.


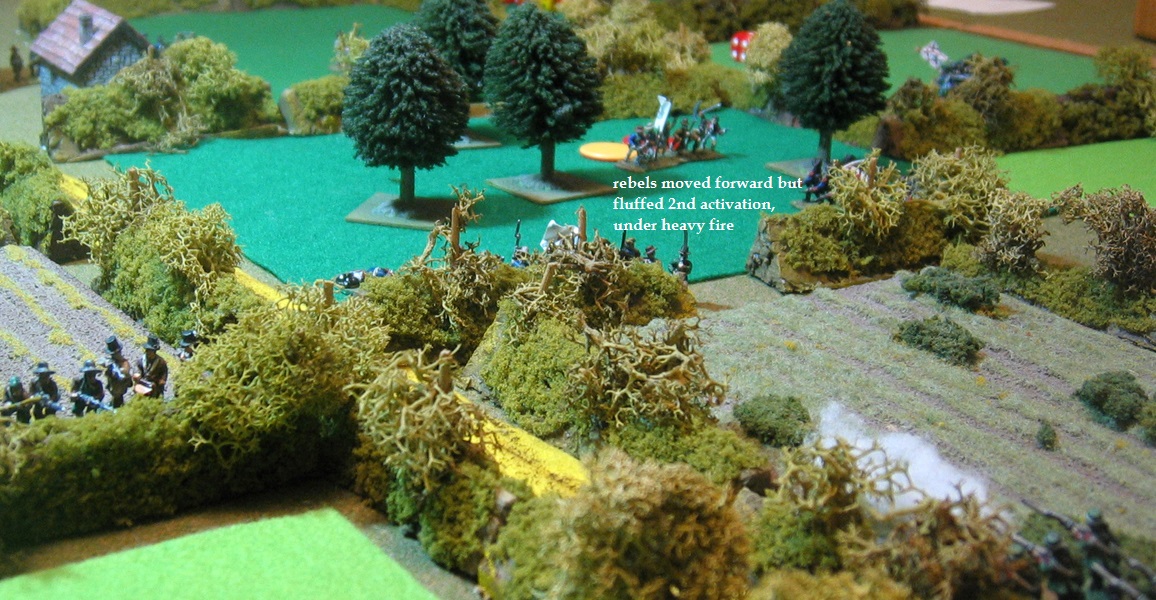
The shot up Prussian right flank cavalry showed their faces after the Fusiliers routed the Austrian artillery with musket fire from the woods. The Hungarians were chased off the hill after that. I had not been taking care to note when the Fusiliers were available targets.


We began rolling to see when night fell at the end of turn 8. It fell at the end of turn 11, a good thing too because my cavalry squadron was going to be the target of infantry and artillery if the game continued. I first recorded the game as an Austrian victory, with 3 points for the crossroads against 1 Prussian point for causing 1/3 losses to us. Later I realized they also got two points for avoiding 1/3 losses to themselves. So we had a 3 – 3 tie. We dominated the objective at game end but at too high a cost, a pyrrhic victory. Austrian losses were 11 points; one cavalry unit (5) and the artillery (6) routed. We lost 25 infantry bases of 64, 7 cavalry bases and 1 run off of 16 and our sole artillery base routed with 50% losses. Prussian losses were no units routed though all the cavalry were down 50%, 8 cavalry bases of 16 and 10 infantry bases of 48. You can see how well my plan survived contact with the enemy and how my lesson in cavalry tactics panned out.

We played 11 turns in slightly over two hours, not counting a break for dinner; a marvelous beef bourguignon prepared by my wife, along with potatoes, French bread and a fig cake. David hadn’t been around in a very long time so the dinner conversation was longer than usual and a fine time was had.

All liked the game. I think perhaps the firepower may be a tad strong for the Seven Years War, though the large numbers of figures look good. I would be hard put to field such big units in the French and Indian War or the American Revolution. I also think if we play this scenario again a number of smaller woods rather than one large one will make it clearer who can shoot and be shot at. My miscalculations on that cost us our artillery and severe damage to the Hungarians when we allowed the Fusiliers to move up through the woods and open fire first. In retrospect the skirmishers should have gone into the woods to delay the Fusiliers and allow the artillery to join in from a comfortable distance. I think using a large shock cavalry unit would be a problem since while it could take more damage it would also be more cumbersome.

Perhaps a single large wooded area will do for the game of the Monongahela (Braddock’s Defeat) that I will eventually stage. I’ve played that battle with at least three different sets of rules over the years and keep coming back to it.

That’s all the game reports for this year. Merry Christmas, Happy Hanukkah, Bona Saturnalia and a Happy New Year to all.

Sunday, November 24, 2019

Seven Years War, Rebels & Patriots


Last Thursday we played a game of Rebels & Patriots set in the Seven Years War. Instead of 12 figure infantry units, we used 16 bases with 48 figures per battalion, using 4 of our usual battalions grouped together. That’s why they have so many flags. Small units (cavalry squadrons and skirmishers) have 8 bases with 16 or 24 figures respectively. I figured we could have lots of figures on the new teddy bear fur game mat (from Killing Fields) and yet have a small number of units on each side.

The Prussian general Zeitgeist rolled up wheezy as a character trait. It prevented him from entering woods, no big problem since the Prussians have no light troops in this scenario. Austrian general Esterhazy got ballroom darling, which allows him to get give a unit a 3” bonus move once per game. Rick correctly predicted it would be forgotten in the heat of battle.

The scenario is based on the Lament Ridge scenario, with the ridge replaced by the crossroads.

The Austrians had 3 line infantry battalions @ 4 points each, a small skirmish unit @ 2 points, 2 small shock cavalry squadrons @ 5 points each and 1 medium artillery section @ 6 points. The Prussians had 2 line battalions @ 4 point each, 1 line battalion “good shooters” at 6 points, 2 small shock cavalry squadrons @ 5 points each and a medium artillery section @ 6 points.

Both sides deployed as below. Moltke said “errors in deployment cannot be rectified”.

Cavalry on both sides could not wait to get into musket and artillery range of the enemy.


It took 85 minutes to play 5 turns. The Austrians lost two cavalry squadrons for 10 points while the Prussians lost 1 for 5 points. Austrian bases lost in combat, rather than fleeing, were 11 cavalry and 12 infantry. The Prussians lost 4 cavalry and 2 infantry. Mistakes were made by both commanders and the umpire.

General Zeitgeist AKA Bahama (don’t ask) gained 6 honour points. General Esterhazy got none but avoided getting hit by enemy fire.

I think this worked well and looked pretty good. We used magnetic sabot bases to show that units were in close order. I think in the future we’ll put all save skirmishers on these bases (4 small bases fit on each) and indicate close order by putting them together neatly, and otherwise by staggering the bases. Our next game of some sort will be after my trip to Maine.

Friday, November 8, 2019

Board game: Mark Herman's Gettysburg


Most of the Fencibles were unable to attend last Thursday’s game session due to the various demands of Real Life, leaving just Rick and I. We decided to play the new Gettysburg board game by Mark Herman. A very short review of the game can be found here 
A more extensive review with some details of a game played is  here

The game has just a few counters, a small map and rules that are simple but not simplistic. The game is billed at requiring 60 – 90 minutes per game. We set out for our first game with Rick as the Union Meade and me as the secessionist Lee. The game is simple but radically different from other board games we have played. Each day has two turns, morning and afternoon, six turns for the whole battle. Players take turns moving units (CSA has 9 infantry division counters, USA has 7 infantry corps counters). Units can be moved multiple times in a turn. Once one player (typically the Union player) passes, the other rolls a die and adds the number of unengaged units on the map to find how many turns are left. Units have a marching side (4 movement allowance for infantry, 6 for cavalry) and a battle formation side with 1 hex movement for all. Marching units that spend their entire move on roads move at double speed. Once within 2 hexes of an enemy combat unit, the moving unit must flip to the battle formation side. Getting a coordinated attack together once the other side has passed can be a real chore. The combat phase is similar, each player attacking in turn until one passes, leaving the other to roll a die to determine how many more attacks are available this turn. Victory is based on losses. Since the Union wins ties, the onus of attack is on the Confederates. Each side has a number of artillery support points (CSA 11, USA14) that can be expended in any given combat. When both sides call for artillery, a dice-off artillery duel decides which one influences the fight.

We played the first three turns of the game. A combination of hot dice and Rick having trouble reading the map and counters resulted in 3 Union corps sleeping with the fishes. Rick threw in the towel and I agreed it was hopeless at that point. We had played 3 turns in about an hour, but then it was our first game and we consulted the rules regularly. As noted above, there are some very different concepts in this game. We broke for dinner.

Afterwards we played a second game, switching sides. I rapidly developed a method of falling back into defensive terrain (ridges and hills) and then passing, making it hard for Rick to launch coordinated attacks. Still, he was pushing me back steadily for the first two days, with each side losing a single unit to the dead pile. The elite Union I Corps was knocked out for two turns but returned to the fray late on the second day. (Units can be knocked out for two turns or forever) The third day saw me farther back than the Union actually retreated, but with a tie looming Rick had to make a number of hasty assaults. The dice gods forsook him and he lost two more units without taking any Yankees with him. We decided to end the game. We had played 5 turns in 90 minutes. Again, Rick had trouble reading the map and the unit counters.

We were both intrigued by the movement system. I can see this being used for an operational game, like Sherman vs. Joe Johnston in north Georgia in 1864, with perhaps each day being a turn.

Minor beefs: the map is pretty but the hex lines are faint. A less pretty map with clearer hex lines and defensive terrain would help our aging eyes. The CSA units are listed in the order they appear, very helpful. But the USA units are listed in order by corps number, which is not the order they appear. I will have to make a list. Also, the turn units appear are listed, for example, 7 1 PM. This happens to be turn 2. If the list just said turn 2 it would be easier.

Minor beefs aside, this is an interesting game system and gives a decent rendition of the actual battle. The first two days are hard for the Union but if the Rebs haven’t hurt them hard by the third day, they are going to have to try to take the Yankees out then and there, perhaps with something risky, like Pickett’s charge.

In two weeks we will play a Seven Years War game with a small number of units, each with lots of figures. It should look quite nice but still give a quick game.

Friday, October 25, 2019

Skirmish in the Vendee, 1793 with Rebels & Patriots


We played a skirmish scenario based on the 1793 Vendee rebellion against the French revolutionaries. The Whites were led by the Chevalier Sangre Bleu (in game terms both are 2nd Lt.). Bill and Rick decided to take the royalist Catholic peasants, defending in hedgerows and outnumbered 27 points to 20. They had not played Rebels & Patriots before. I thought the “native” troop type in the rules was better at representing the Vendee peasants (and possibly highlanders of the “45” rising) than the intended North American woodland Indians. I mentioned that natives, unable to use the fire action (who could skirmish instead, moving half and firing half), would not be able to match the Blue line in a stand up fire fight. This advice seems to have gotten lost in the general overload of information about the rules.
After taking this photo I added carpet sample "corn" to the "wheat" field. The script editor was not on the job. I preferred to lead the rebels but instead had 2nd Lt. Parvenu. His Blue command had 7 green line infantry units, a skirmish unit and a light artillery piece. The rebels had 6 green “native” units and a skirmisher. I deployed half of my force within 6” of my table edge, followed by the rebels deploying half of theirs at least 16” away from my table edge. Then I deployed the rest followed by them deploying all remaining units. Now we rolled for the character traits of our leaders. We should have done this first.

Parvenu was blessed (a strange trait for the man leading the atheist side) which made him harder to kill. Sangre Blue first rolled “cunning”, which allows him to field two dummy units. Since we were not ready to do this (not enough figures painted) we re-rolled and his new trait was “familiar face” which allows him to field a free unit of locals, green, timid line infantry who are poor shooters. This is a totally expendable unit with no effect on force morale. Since we should have rolled for traits before deploying, I said they could put this up front in place of another unit that went into the second line. It went into their right center and would prove useful. And away we went.


My right center moved very slowly through the cornfield, taking a number of turns before they finally all lined the first hedgerow. A fire fight broke out that slowly increased in numbers involved. Losses were low at first due to both sides being behind hard cover, but then losses increased, going against the rebels as 5 units on my right shot it out with two enemy units. In the center my skirmishers and artillery slowly hacked away at Sangre Blue and his unit. On my left things went south early on.
The few units who saw this passed their morale tests. Both sides had mostly green units and lots of trouble activating them. I slowly advanced in the center.


Not in the photos, my right flank unit crossed the hedgerow while all the others watched, failing their activation rolls. This unit then charged the rebels behind the hedgerow. They killed two and lost 5. Somehow they passed the resulting morale test.
Also off camera, the White skirmishers lost more than half their men and failed morale badly, routing on the next rally attempt. This caused a lot of morale tests, all passed. The White left flank was down to one unit that started taking hits. In time it fell back under orders but then stalled in the open field behind.


Sangre-Bleu didn’t gain any honor from this but didn’t disgrace himself either and more to the point, wasn’t hit. Parvenu gained 7 honor points. Another 13 will see him promoted to 1st Lt.

The game went a lot slower than I expected, due to the hard cover and the frequent failures of green units to activate. It was also slow because Bill and Rick were learning the rules for the first time. We played 13 turns in 3 hours and 20 minutes. Our other R&P games have gone one or 2 hours. That said, all liked the game, finding the hedgerow combat interesting. All said they would like to play it again, though I’d like to play the rebels next time. I do think the rebels did not make enough use of their superior mobility. I did like the way the native troop type worked for angry peasants armed with a mix of muskets and pole-arms. The next time we play this I think both sides will not be green and the cornfield will have been harvested to speed the game up.

The next game in two weeks will likely see either DBA or if attendance is light, a new board game of Gettysburg.


Tuesday, October 15, 2019

Parthian Cataphracts (Khurasan Miniatures)

I finally got off my rear and finished 4 elements of Parthian cataphracts to begin my DBA army. These are Khurasan figures, very nice. The only hitch: the lances bend when you look at them too hard. Hopefully they won't break too soon. Next I have to paint up some 24 horse archers. The DBA force (as I plan it) only requires 16 more but if we play Basic Impetus I could use some more. And some foot archers to finish up the force.

The heavily armored cataphracts give this light horse army a bit harder punch than usual. The Parthians did badly beat some Roman armies that made the mistake of invading across flat open country. The worst hiding was that given to Crassus at Carrhae in 53 BC. In time, the Parthians were dethroned and disposed of the by the Sassanian Persians. Perhaps someday I'll paint them up. Perhaps not. The figures are so nice they deserve a better painter and a better photographer. But here they are.