Monday, September 14, 2026

Albuera 1811, Bloody Big Battles

I’ve been hankering to play this battle for years, never got around to it until now. The new Bloody Big Peninsular Battles scenario has one for Albuera. I made a game mat. Jay agreed to take Beresford's Anglo-Portuguese-Spanish. I got ready to try on Soult’s cocked hat. Allied troops are in italics. Yellow markers indicate disrupted units/silenced artillery, red arrows show charges, yellow arrows show forced retreats. Low ammo shown by .22 cartridges. The large arrows indicate objectives, red when held by the Allies, flipped to their blue side when held by the French.


I opted for the historical French deployment. Much of the Allied army is held in place at start, representing Beresford’s indecision on the day. My first turn movement dice weren’t too bad. One artillery unit, one infantry and one cavalry failed to move. Everyone else moved at a decent clip towards the Allied right flank. Jay had trouble moving unengaged units to the front, along with all those tied down by scenario rules.


One nasty fight saw intrepid Zayas’ first Spanish brigade destroyed in a bloody brawl with one of Girard’s brigades, which was soon dispatched by Cole’s British brigade. Various Allied units failed to march to the sound of the guns, while the French pushed hard. A grand battery of horse artillery, aided by some of Werle’s infantry, shot up Ballesteros’ infantry over a couple turns, reducing it to spent (bad news).


It has become clear to me that getting decent movement rolls is more important than decent combat rolls, though dreadful ones in either category truly suck. On the fourth turn, the dice were kind to me, simply by not being trash. Most of my infantry moved, those needing only half-moves getting them. Some artillery and the lancers decided to take a break, but my attacks against the Allied right went in. My assault dice (opposed D6 rolls) were kind, none less than 4. Jay rolled good, bad and indifferent. I had modifiers in my favor, a number of his units disrupted, some spent. The bad rolls saw his units badly beaten, the indifferent ones were dislodged, even the good ones were driven back. Girard’s lead brigade thrashed their first target and exploited into one of Stewart’s British infantry units in march column. In all the years I’ve played the game we’ve not had such a column assaulted before. Shot at, yes. This called for a look in the rule book. Disrupted, Girard managed to push the British back. Another British unit charged and routed the small French grenadier unit.


One of Godinot’s brigades advanced past their halted colleagues, storming the bridge south of Albuera. Another first-time occurrence required a look through the book. The raw Spanish infantry defending the bridge were spent. The attack narrowly drove them back and secured the bridge. A French cavalry brigade headed west just south of the bridge to take a Spanish brigade in the rear. They exposed their flank to three Allied batteries, who rolled 12, going low on ammo. The cavalry brigade vanished. The following photos are back-lit, and not even Photoshop can rescue them. My error.


I now had the two hills on the Allied right flank, the bridge and my dragoons had ridden past the road to Valverde, 4 objectives. Cole’s British infantry unit had been routed, making 5 objectives total. I needed 4 for a win, 3 for a tie. Jay needed to recapture 2. Running late, he threw in the towel. Soult raised the siege of Badajoz. The Spanish had been left out to dry, slammed by the French with help too late, too little.


We played 6 turns in 3 hours. The losses were extremely lop-sided, due to the piecemeal way the Allied reserves were fed into the fight, my grand horse artillery battery and my fortuitous 4th turn.


French losses: 3 infantry bases, 1 fled (of 32), 2 cavalry (of 8), total 6 bases.


British losses: 5 infantry bases.

Spanish losses: 10 infantry, 1 fled (of 22), 2 cavalry, ½ artillery, total 13.5.

Portuguese losses: 2 infantry


Grand total: 20.5 bases.


Jay said he enjoyed the game in spite of the ending. I would like to try this again, perhaps as Beresford next time. We’ll see. Real life intrudes on our schedule, as always. We had two situations not seen in 10 years of playing, calling for a search in the rules.

Tuesday, September 8, 2026

Book Review: The Crimean War, by Orlando Figes

By the time the French and British armies, on a mission to rescue the Ottomans from Russian invasion, had arrived in the eastern Mediterranean theater, the Russians had retreated from the Danube valley. The Allies were disappointed.


The British had hoped to chastise the Russians; Napoleon III sought a brilliant victory to bolster his shaky domestic standing. Casting about for something to do, they decided to capture the Russian Black Sea Fleet’s base in Sevastopol. That’s why they went to the Crimea.


Over the years I read a number of books about the Crimean War, all Anglo-centric. And I wondered why the Russians had fallen back. My first book, The Destruction of Lord Raglan, by Christopher Hibbert, named the various problems facing the Russian commander. One item on the list of woe was “threatened by an ungrateful Austria”. Was this threat a strong letter to the Times? More on this later. The various problems afflicting commanders of the time were also listed, strong enemy resistance, supply problems, sickness endemic to armies before the discovery of germs, etc. The vague reference to an Austrian threat never got my attention. The plucky British, aided a little by the excitable French, dealt withering blows to the stolid, unimaginative masses of Russians. Fine writing, biased history.


Later, The Battle of the Alma, by Peter Gibbs, merely notes that the siege of Silistria (an Ottoman Danube fortress), was raised before any but a few adventurous British officers could arrive. Apparently, the besieging army just floated away. I wasn’t expecting much detail on the raising of the siege, and got none.


A third book whose title I have forgotten declared that those early British officers had led irregulars on raids of the Russian supply lines, causing the siege to be lifted. This was obvious hogwash. 60,000+ strong armies are not forced to retire by hit-and-run raids. A force seizing and holding a choke point on the supply line would be another story.


Then I found The Banner of Battle: the Crimean War Story, by Alan Palmer. This is less Anglo-centric than the previous three, and devoid of jingoism. It is primarily about diplomatic history. In it, I discovered that the Austrians, upset by Russian forces in the Danube valley, mobilized 100,000 troops, threatening the Russian flank. Ah, now there’s a reason for a large army to withdraw; a flank threat and yet another nation possibly entering the war against them. Finally, a credible reason the Russians retreated from the Danube.


The book tells of Florence Nightingale. Her humane modifications to hospital care didn’t reduce mortality at the hospital, as the water source was compromised. She learned from this and later greatly reduced mortality in London by cleaning up the water supply. Palmer does overstate the range advantage of Minie rifles over the smoothbore muskets that almost all Russian infantry carried. More on this in a bit. 


More recently I finally came upon a copy of The Crimean War by Orlando Figes. He is a scholar of Russian History, and includes the Russian point of view, missing from the previous works. He notes the extremely bad blood between Eastern Orthodox Christians and Catholics, not to mention Protestants. Blood had flowed before at the Church of the Holy Sepulcher in Jerusalem. As self-declared protector of Eastern Orthodox Christians in the Ottoman Empire, Tsar Nicholas I seized upon the latest brawl to expand Russian territory at the expense of the declining Ottoman Empire. An absolute ruler for the last 29 years, unused to hearing things he didn’t like, he seems to have been flirting with pan-Slavism. The grand goal of this would see all the Slavic nations of the Balkans and Middle Europe bending the knee to Moscow, and the Orthodox Greeks too, who would be back in Constantinople. Over a prostrate Ottoman remanent. Heady stuff, no doubt.


The Austrian (Habsburg) Empire and the Russian (Romanov) Empire had been the backbone of the conservative Concert of Europe since 1815, being the two most conservative and economically backward states in Europe, bar the Ottomans. There had been the revolutionary upheaval of 1848-9, when the Habsburg dynasty had a near-death experience. The Hungarians had been successfully fighting for their independence when huge Russian armies invaded from Russian Poland, quashing Hungarian hopes. Nicholas assumed the Austrians owed him big-time for this.


But when the Russians invaded the Danube in 1853, Kaiser Franz Joseph was not pleased. He didn’t want expanded Russian power in his back yard and certainly didn’t want his Slavic subjects getting ideas about throwing off Habsburg rule. He not only mobilized a lot of troops, he gave Nicholas an ultimatum, threatening to join Britain, France and the Ottomans in the war. Now there’s a truly viable reason for that large Russian army to tuck tail and run. The “threat by an ungrateful Austria” was not a stern letter to the Times. The rupture between the two empires would still be in effect in 1914, one of the many things leading to the outbreak of war.


Figes also overstates the range advantage of Minie rifles over Russian smoothbores, quoting ranges over 1,000 yards. Current research by Paddy Griffith, Brent Nosworthy and Earl Hess maintains that in the hands of most soldiers, Minie rifles were effective at about 150 yards, still a serious advantage over the 75 yards of smoothbores. One of the 4 British infantry divisions was armed with smoothbores. Most of the French infantry save the Zouaves were armed with smoothbore muskets. I do believe that the standard Russian field formation of battalion columns 8 to 12 ranks deep was the wrong formation to meet Minie rifles in. Most soldiers fired high. The  curved Minie trajectories made a number of those high shots come down in the rear ranks. I think that’s one reason the Russian losses were so high in field battles. Shots that normally missed found targets. Specialist elite troops like the British Rifle Brigade or Berdan’s Sharpshooters of the later American Civil War were better prepared to take advantage of the longer ranges of Minie rifles. But the average 19th century soldier was not.


Figes has the Light Brigade defeat the Russian cavalry behind the Russian artillery at the end of the Valley of Death, although at too high a cost. The British bungled their supply arrangements at the siege of Sevastopol, while the French were moderately professional, shown by the different death rates. The Russians died in job lots under bombardment. But the Allies never cut the city’s supply lines, so fresh troops kept coming in.


The British cherished memories of the Thin Red Line, the Charge of the Light Brigade and the much more successful Charge of the Heavy Brigade. The French, after finally storming the city in 1855, got to name various streets, bridges and such in Paris (and subsequent Metro stops) after their battle places, Alma, Crimee, Sevastopol, Malakoff, etc. The Russians claimed Sevastopol as a secular icon, a shrine to Russian bravery, a place it occupies in their mythology today.


Figes explains how the sewage plumbing of the Scutari hospital leaked into the water source, defeating Florence Nightingale’s best efforts. A sorry thing.


The war lasted longer than any involved foresaw and was much too costly in blood and treasure. Bismarck’s wars of German Unification took center stage, putting Russian encroachment in the back seat. When France was humiliated in 1870-71, Russia disavowed the Crimean peace treaty and re-armed Sevastopol.


When Russia next went to war against the Ottomans in 1877, Britain’s attention was fixed on the new German Empire, France was still reeling from their recent defeat, as were the Austrians, who were assuming their position as Germany’s lap dog. The newly unified Italy had gained much of what they wanted from their alliances, first with France and then with Prussia.


Franz Joseph helmed Austria through the humiliating defeat of 1866 and into World War One before exiting the world stage.


Nicholas died during the war, largely un-mourned. A long-time autocrat, with a rather mystical attachment to pan-Slavism, he got into an unsuccessful war against 4 nations (Piedmont/Sardinia later joined up in the hope of later French assistance in Italy) and suffered a costly defeat. That is pretty much how he was remembered until recently. 


His reputation has been dusted off and freshened up. His portrait hangs in the antechamber of Putin’s Kremlin office.

Tuesday, August 25, 2026

The Battle of Brooklyn 250th Anniversary Reenactment

The Battle of Brooklyn AKA Long Island, took place Last Saturday, August 25, in Prospect Park, which actually saw combat that day 250 years ago. I have not seen a reenactment in New York City before and have not previously met more than 5 uniformed reenactors at a time. I found it quite impressive. My wife took some photos. A tip of the hat to her.


Jay and I wore our club colors. We were both surprised at the number of spectators, expecting hundreds and finding thousands.

The Continentals eventually engaged a group of Hessians, who were beyond our line of sight. Later we saw perhaps a score of them. I think the Continentals were near a hundred strong. In time, a similar force of redcoats appeared behind their left flank. The sound system wasn’t strong enough to reach most of the crowd. I hoped most had read up on the battle and knew the redcoats were flanking the Yanks.


The final British charge at the quickstep sent the Continentals flying. 

In time, all troops on both sides formed a single line and fired three volleys.

There was some further marching about. 

Hessians then formed with British. 

The Continentals paraded before the Crown troops. A Continental officer saluted them and they presented arms. The fellow on the right below with all the gold braid is the Hessian officer. Well into the role, he had a truly imperious walk.


A couple Royal Artillerymen were on their own. The car with the gun and the rest of the crew broke down on the way. 

All then headed to 3rd Street and the Old Stone House, which saw combat back in the day, albeit in a different location, later paved over for a large roadway. Here are Hessians forming on a park pathway leading to 3rd Street. 

A gunner was actively collecting intelligence about the local area. 

The club t-shirts led Fencible emeritus Dennis to us. He took this picture of a soldier and his Galaxy 1776. 

We followed the troops to the Old Stone House, where folks mingled. We passed a couple Continentals speaking German. I presume they were from the German Regiment. Now that's historical accuracy.


There were a number of stands, including one from the US Army Center for Military History. They had small campaign books, gratis. I picked up one on the New York Campaign 1776, by Ricardo Herrera. Upon opening it later, I was pleasantly surprised to find that the author is indeed a serious historian, and a former officer. His historical chops were deep; his military knowledge had a different slant than many of my other books. While he found errors by the British, he dissected the early Continental army, amateur from top to bottom. I presume you’ve heard that saying, amateurs talk tactics, professionals talk logistics. Along with tactical flaws by amateur generals, Washington first and foremost, there was very poor discipline, disorganized supply and lousy basic hygiene, which explains the large number of troops on sick call. Keep the privies away from the fresh water, please. The First Maryland (badly hit covering the retreat of the army) and the Delaware Regiment were noted for discipline and steadiness.


The maps aren’t detailed enough for battle scenarios, but they illuminate the operational issues. A map of the colonies shows population density, which clarifies why the armies campaigned where they did. It also shows the demarcation line that Parliament declared, hoping to keep British American settlers from expanding into Native territory. This last was likely a stronger cause for revolt than taxes. The only small beef I have is that the poor overall strategic Crown choices aren’t that clearly explained. But he had only 85 pages to work with. It has a short appendix and a bibliography adding another 11 pages. Now I’m kicking myself for not grabbing the two other volumes they had, on the New Jersey and Saratoga campaigns. Thirteen volumes are noted in the book.


Perhaps they will be at the White Plains reenactment in October. A young man there said the Army has 40 museums. I only knew about the one at West Point, must investigate.


Monday, August 17, 2026

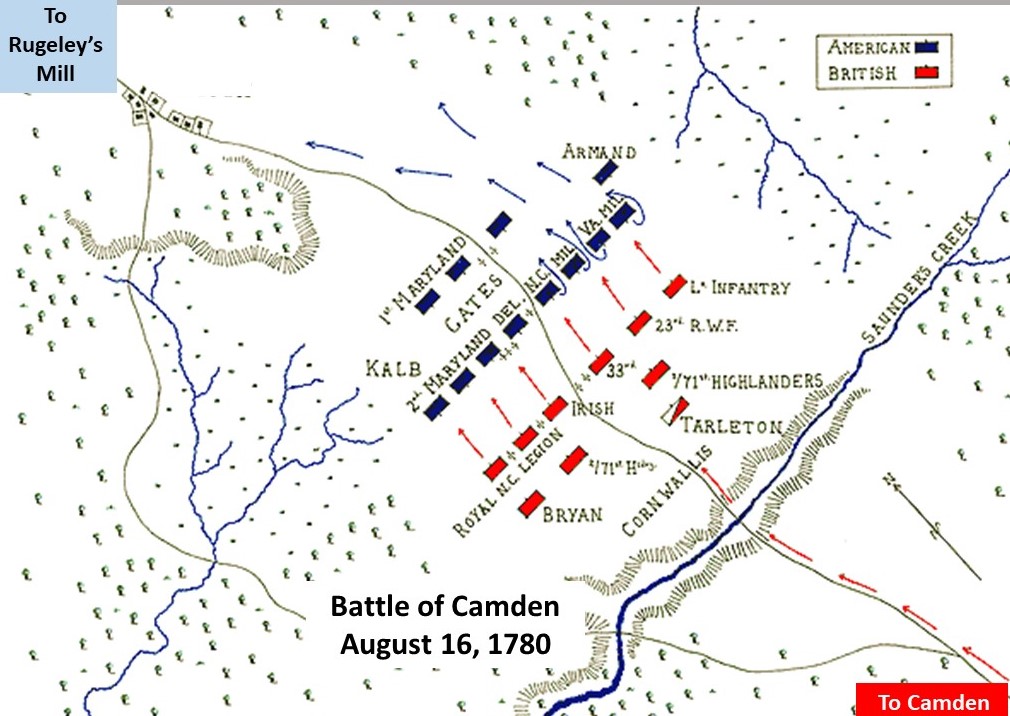
Camden 1780, via BBB - Cornwallis vs. Gates - the Scenario

 Camden S.C.  August 16, 1780 each base = 100 infantry, 50 cavalry or 4 guns


The fall of Charleston left South Carolina at the will of the British army, save for guerilla activity by Francis Marion and Thomas Sumter. The victor of Saratoga, Horatio Gates, was sent to redress this. He chose a path through country devoid of supplies against the advice of his generals. Both armies tried to steal a march in the night. After a confused nighttime encounter that nearly saw panic in Gates’ army, both sides deployed in the dark.  Gates discovered that his army was about 3,000 strong instead of the 7,000 he assumed it was.


Continental Army Horatio Gates, 3,350


DeKalb Division Firebrand

4        Tr       Smallwood 1st Md Brigade

6        Tr       Gist 2nd Md Brigade + Delaware

1        SA      6 lb. guns

Caswell NC Militia Brigade

4 F     Raw   1st NC

4 F     Raw   2nd NC

4 F     Raw   3rd NC

Stevens VA Militia Brigade

4 F     Raw   1st VA

3 F     Raw   2nd VA

1        LA      3 lb. guns

Independent units

4 F     Tr       Porterfield State troops, not Continentals

2 F     Tr       Armand’s Legion cavalry

1 Camp or wagon model on baseline behind center.


33 infantry bases, 2 artillery, 2 cavalry , 1 leader


All Raw infantry is Fragile and Poorly Drilled

DeKalb is a Firebrand and adds +1 in Assault to an attached unit


British Army Cornwallis, 2,132


Rawdon Brigade Firebrand

4        Tr       Hamilton NC Regt. & Legion Foot

3        Tr       Irish Vols Loyalist

3 F     Raw   Bryan’s NC Vols

1        LA      3 lb. guns

Webster Brigade

3 A     Vet     33rd Foot

4 A     Vet     23rd Foot & Lt Infantry

1        SA      6 lb. guns

Reserve directly under Cornwallis

3 A     Vet     71st Foot Highlanders

4 A     Tr       Legion Dragoons

1 Camp or wagon model on baseline behind center.


20 infantry bases, 2 artillery, 4 cavalry, 3 leaders

The Raw NC Vols are Fragile and Poorly Drilled


Game lasts 7 turns. British deploy second, move first.


Historical deployment map:

https://allthingsliberty.com/wp-content/uploads/2023/10/BattleMap.jpg

Note how large and small units have similar footprints, a suspicious feature on many maps of this battle. The Historical deployment is heavily balanced against Gates.


Scenario rules: All Raw Continental units start out with a disrupted marker, upset by the misguided order to attack the British. If two Rebel units rout, Gates flees and all Raw units also become passive. Units that  exploit may loot the enemy camp. A unit must roll a full move to stop looting.

Victory: both sides are trying to break the enemy army. Each army breaks when 5 units and/or leaders have been destroyed or routed off the table. Each leader, Trained Continental base (not State troops) or camp looted lost counts as 2, other bases count as 1 each. If your score is twice the enemy score or more it is a decisive victory. If at least 50% more it is a substantial victory. Otherwise, a higher score earns a marginal victory.


Summary: Gates’ left and center contained his least dependable units, facing the best British units. The Virginia and North Carolina militia, ordered to attack the British, instead became disordered. Panicking at the British advance, many threw down their weapons without firing a shot. They fled the field, taking Gates with them. He abandoned the army, riding 180 miles in three days. He must have had a fine horse. De Kalb was giving Rawdon’s brigade a very hard time, until flanked by the British right wing and reserve. De Kalb was mortally wounded, shot and bayoneted many times, fighting like a lion until the end. It was one of the worst American defeats of the war. Both Gates and De Kalb have streets and subway stations named for them in Brooklyn, Gates surely for Saratoga rather than this debacle.


What if: Gates deploys in a sensible fashion. The British sketch a map of their deployment. Then the Americans deploy within 16” of their table edge, followed by the British within 16” of their table edge according to the sketch. American militia starts without disrupted markers. Surely you can do better.


I have merged various infantry units to avoid a profusion of tiny units.

AWI mods for Bloody Big Battles - Bloody Small Battles?

BBB AWI mods by Two Marshals & VT

http://twomarshals.blogspot.com/2017/04/awi-bloody-big-battles-test-game.html

These are based on Two Marshal's mods with some of my own changes.

Weapon

3”

6”

9”

12”

18”

Carbine

1


ML

1

1


Rifle

1

1

1


SA (medium guns)

6

4

3

3

2

LA (light artillery) 3 pdr

4

3

2

2

1

A new artillery type, Light Artillery 3 lb. grasshoppers and the like.

Arc of fire is 45 degrees (not 90 as usual)

Cavalry may dismount (formation change) and use carbines while dismounted. Undisrupted, dismounted cavalry may evade, ending mounted.

If you don’t have or prefer not to use dismounted cavalry figures, use Two Marshal’s version; cavalry can’t dismount and may not fire. I do have some, thus the rule.

Cavalry and infantry may support infantry if both deployed in line.

Otherwise, no forming deep, only line and march column formations.

Only one rank may fire.


The following affects all militia and many early Continentals (1776-7)

Poorly drilled: Formation change takes a full move, move outside FCP,  turn at end of move, passage of lines -6”

Trained and veterans passage of lines -3”, may charge through friends

NB (no bayonets) -1 in Assault, unless unit is already Fragile


Terrain

Fences: Linear Terrain, -0” skirmishers, -3” Infantry, -6” Cav and Arty.

Fences give no cover or melee bonus.


Light Infantry (skirmishers) Trait

Drop the shift right if ‘Firer has skirmishers’, Skirmishers cannot charge the front of a formed unit unless the target has disruptions at least = target bases.

Skirmishers -1 in Assault, can evade as per Cavalry and Limbered Artillery.

Firebrand: some leaders add +1 to attached units in Assault. If left alone in contact with enemy they may be lost.


Skedaddle Trait – affects all Raw militia units – better militia would be Trained, such as Marion’s, Pickens’ and Sumter’s partisans.  

Unit removed from table after the loss of 2 bases

Panic: Units may receive multiple disruptions, all removed upon rallying.

Movement roll modifiers: each disruption marker on unit -1.

Trained troops ignore first marker, veterans ignore first two markers.

Each friend of equal grade that must retire, skedaddle or be wiped out within 6 “, 1 disruption, Each of better grade, 2 disruptions

Risk to leader: when a leader is attached to a unit that loses any bases, the opposing player may roll a die for each loss caused. A roll of 6 means the leader is lost and not replaced. Otherwise, leaders attached to units may move with them, exploiting or retiring.


Further: Indians and rangers have no penalty on movement rolls when in wilderness and as targets in woods do get 1 cover shift left, thus one shift for skirmish target, another for woodsmen.

For the Monongahela (only), British troops are easy targets (one shift right shooting at them) because Braddock refused to let them “take trees”.

Units are all light infantry or all formed troops, no mixing at this small level.


Comments are welcome.

Saturday, August 15, 2026

Camden 1780 via Bloody Big Battles - Cornwallis vs. Gates

We tested my reworked Camden scenario with the historical deployment. My premise is that the historical deployment should see a Crown victory. Jay led the Continentals and I was Cornwallis. Andrew showed later with Dunkel and cheered the carnage. The field is simple, a fairly open area with swampy ground on each flank, impassable to artillery, difficult for others.


Many sources claim even more NC Militia (all Continental forces in italics) than I show, while maps indicate they had a fairly small frontage. That’s why they’re two and three lines deep here.


I forgot a picture of the starting deployment but here’s the first British turn.

Adding text to the photos I mistakenly started naming the 23rd (plus Light Infantry) the 33rd. The 33rd was routed by hot enemy dice. All photos after this show the mislabeled 23rd. Mea culpa.


I goofed here and had the Legion cavalry pass through the 71st and attack Smallwood’s regulars, who were in good order. They emptied saddles, removing a base and pushing the horsemen back behind the 71st, where they would prevent the Highlanders from retreating later, when things went badly. They would have done better to fall back in good order. The threat would likely  have stopped Porterfield’s flank move.


Porterfield was routed; the 23rd exploited and defeated Smallwood.
 

The game went on a turn longer than it should have. I think the last NC militia unit fled during turn 4, which should have ended the game as the Continentals broke. I played the British half of the 5th turn and Jay threw in the towel. In spite of the hiding he took, he enjoyed the game. Andrew was happy from the sidelines. We all liked the contagious panic. Some time we need to play it with free deployment. It should be a lot closer.


We played 4 ½ turns in 135 minutes. There was a lot of action from the start, since the front lines were within 12” of each other.


The final losses: British lost 6 infantry bases, 3 ran off, 3 cavalry bases, 1 ran off. Gates lost 12 infantry bases, 17 ran off. 12 British bases against 29. I was uncertain about the victory conditions. It actually worked out better than I thought, a decisive Crown victory. If eliminated Continental regular bases count double, then it was 12 to 35, a thumping victory, something like the actual battle. 3 British units routed, the 33rd, the 71st and the Legion Dragoons. The Continentals saw all 5 militia units and Porterfield rout. The British had one unit of NC militia, every bit as bad as any Rebel militia. It lurked in the rear, firing several times near the end of the game.