Showing posts with label French & Indian War. Show all posts

Friday, January 25, 2019

Monongahela 1755 revisited, Post of Honour


We played another game of the 1755 Battle of the Monongahela using Keith Flint’s simple Seven Years War rules, which now have the title “Post of Honour”. The development of these rules are cracking along and we should try them in a game set in Europe one of these days. Rick and Ken commanded the French & Indians while I played General Braddock. A single red marker indicates weakened status, a yellow marker shows a unit in bad morale retreat, and two red markers shows a routed unit, about to be removed from the table after sowing dismay among friends. Cotton smoke shows who has fired. Scenario is here Monongahela 1755 scenario

I wanted to see how the game played with the latest update on the rules and also my variant rules for the Indians; allowing them to charge weakened enemy line infantry. The starting deployment below shows Braddock’s redcoats marching towards Fort Duquesne (relieved at having forded the Monongahela without ambush) colliding with Beaujeu’s French & Indians, who were heading toward the ford to lay an ambush.
Immediately Gage’s advance guard was beset by swarms of enemy, as in the actual battle. His command was made up of the grenadiers and those extra grenadiers Braddock had decreed, hence the “grenadiers” label. I treated them as line.


The “grenadiers" suffered heavy losses to Indian fire and collapsed when charged, spreading disorder.

French Troops de la Marine charged the guns. The gunners fired and hid behind the grenadiers, who fell back under heavy fire. I ruled the gunners fled the field.

And on the 5th turn it all came undone.

Eagle’s view of the table at game end.
We played 5 turns in a little under 2 hours. The British suffered 47 hits (many of them from seeing friends retreat/rout) while the French & Indians took 11 hits. A couple of their units were on the verge of becoming weakened, but none crossed the line. It was time for dinner, and some wine.

I’m pleased with the results. The advanced guard was shot up badly, disordering the main force coming up as in the actual battle. The rule for Indians checking morale when hit by artillery was moot. The French kept to the center and the Indians rarely got within visibility of the road-bound guns. Perhaps allowing the Indians to charge was going overboard. This seems to have made them the “grenadiers of the woods”. I’ve seen a similar effect for Morgan’s Rifles in an earlier set of rules. The Indians went through weakened units like a hot knife through butter.

I’m thinking that the Indians waited until the enemy army’s morale broke before they charged. Without this rule the British army might have held on for another turn or two before folding. I can also think of ways to prolong the game further for the Brits. The scenario is heavily balanced against the redcoats, as it should be. They lost nearly 1,000 of their 1,400 troops against a claimed 100 of the enemy on that fatal day. One difference: all the mounted British officers were hit that day, along with the French commander. We lost none. I might have to increase the chances of officer casualties for this scenario, given the fighting was all at close range.

Scenarios set later in the war wouldn’t be so unbalanced since the British started acquiring light infantry of their own; light infantry companies, Roger’s Rangers, the 80th Foot, etc. Also the line infantry learned to take some shelter among the trees, though this made them stationary until rallied back into close order.

We will be testing my scenario for Gaines Mill 1862 via Bloody Big Battles in a couple weeks, and perhaps then return to the French & Indian War – or even the Seven Years War in Europe.


Thursday, December 27, 2018

AAR Plains of Abraham 1759


The last Fencible game of 2018 was the 1759 battle of the Plains of Abraham, using Keith Flint’s Simple Seven Years War Rules, a work in progress. I took the role of the French Montcalm, seconded by Andrew in charge of the Indians and militia on the right flank. Jay took the part of the British Wolfe. We played slowly, since the rules are new to me and newer still to Jay and Andrew. Also, I printed the first version of the rules while Jay had the new version. This caused confusion until the problem was detected. I must delete the old version from my files. Because I didn’t use the small lamp with a slight blue tint, the game mat looks much browner in the photos than it should. I must remember to use that lamp in the future. Ah, the joys of digital cameras.

My final excuse: since the scenario is a work in progress, I decided to do exactly what Montcalm did and attack the British promptly, to see if I got the same result.

The left shows my unimpressive representation of the stunning escarpment along the Saint Laurence River. The wooded areas on the right represent the gentle downhill from the Plains.
All non-brigaded units were treated as out of command, needing 4+ on a die roll to advance towards the enemy (or their side of the table). This cooled the flanks down. We got the initiative and made the British move first. They stood. We advanced and then fired first, not that much of an advantage during the first exchange of shots. Markers show the number of hits each unit has taken.
On the next two turns the British gained the initiative and made us move first, so they could fire first. Once units were close to being weakened, this hurt us. Red markers show weakened units, yellow markers show units with bad morale. Each marker counts as half a unit routed towards that army’s breakpoint. The French breakpoint was 6, the British 7. Hmm, I did fuzzy math. They should both be 7. Next time.

After the second turn we broke for dinner, accompanied by the fine wine Andrew had brought. Jay brought a bottle too, but that will wait for next time.
The third turn saw the French front line savaged by British musket fire. We also realized that we had been making some mistakes with the new version of the rules and began applying disorder hits for seeing friends in bad morale. The French line would have been in even worse shape if we had done this from the start.
Also, the inferior morale rating on most French regulars (they had lots of drafted militia) made it harder to rally them.
Andrew's skirmishers caused some damage to the redcoats on our right.
It was for naught as French morale collapsed at the end of the 3rd turn, with two battalions routed, 4 weakened and with bad morale. Only the weakened Bearn battalion and Montcalm were still in line. Everyone else had given way.
I was pleased that following Montcalm’s tactics had given the same result, with the exception that no officers were hit. In the actual battle all three high ranking French officers were killed, Wolfe died and one of his three brigadiers was badly wounded.

We played three turns in about 90 minutes. I attribute the slow speed to using a new version of new rules, the foul up about which version we were using and the effect of wine on post dinner play. Everyone liked the game. This most European of the French and Indian War battles was quite a treat for the eyes. We should play some actual Seven Years War battles too, since we also have Prussians, Russians, Austrians and some Bavarians.

The scenario right now heavily favors the British, which seems right. They did stomp the French. To balance the scenario perhaps Bougainville’s force (1 regular, 1 inferior light cavalry and 3 militia) arriving on turn 4 or 5 behind the British should be included. Counting them towards the French breakpoint would increase the breakpoint to 9. This might well be too much. I hope to tinker with this, although some games with our usual Bloody Big Battles beckons too. I recently received a scenario for the 1808 battle of Bailen. So many battles, such little time.

Sunday, December 2, 2018

AAR: The Monongahela 1755


We played a game of the 1755 Battle of the Monongahela, better known as Braddock’s Defeat last Thursday. We used Keith Flint’s new work-in-progress Simple Seven Years War Rules. These are designed for the European theaters of that war but I suspected with properly rated troops they would work for the conflict on this side of the pond called the French and Indian War (at least below the 49th parallel). The Monongahela is my acid test for rules in this period. The British were shot up and routed in that battle. If they have a rough time in the game, the rules are doing something right. Our figures were 15mm as usual. All of the British and Indians were Rick’s, augmented with my Canadian Troops de la Marine regulars and militia. The game sees a force of line infantry with a few guns against a all-light infantry force in deep woods, without a single clearing. The underbrush had been burnt off since it was an Indian hunting ground. Braddock decreed that the Foot regiments should have another company of grenadiers. I figure decreeing them that wasn’t the same thing as having twice as many elites, hence the “grenadier” designation in the photos.

Bill opted to play the British General Braddock. I played French Captain Beaujeu with Rick as Pontiac, leading my right flank. The British column below has just collided with the French (off camera to the left).


The left unit of the advanced guard charged; the Ottawa evaded. Bill noted how isolated the charging troops became. I noted that the 6 lb. artillery section was now unsupported. The guns hit the militia and got Captain Beaujeu. Had we been using the risk to leader rule as written, Beaujeu would have been dead. He was slain early in the fight in the actual battle. But our house rules determined that someone next to him was killed and Beaujeu took the rest of the turn to wipe the gore off.

The Canadian militia charged the guns and defeated the crew in a melee that lasted two turns. We decided the crew abandoned the guns. The militia halted in place, looting the dead. The Chippewa and the Troops de la Marine shot down Grenadiers, who flinched.
The Troops de la Marine charged with bayonets and tomahawks. The Grenadiers took to their heels, spreading disorder into the 48th behind them. The beaten gunners fled the field. The French pursued into the lead supply wagons.
Part of the 44th charged and the French evaded before they could loot the wagons.
The “grenadiers” retreated under fire and also spread disorder in the ranks behind them.
The gun crew had routed and 5 British units were weakened; British morale was shaky.
The 48th came forward, pushing the Indian left before them.
Elements of the 44th routed. Another part of the 44th retreated under fire. Two routed and 5 weakened units (counting as half a unit each) and one retreating (half unit) totaled 5 units for the British breakpoint; the British army collapsed. 
The French/Indian force had two weakened units; 1 towards their breakpoint of 3. It was closer than it looks. Several French/Indian units had 3 hits, very close to being weakened. On a late turn in the game Bill rolled 24 dice needing sixes for hits. He got none. He figured his morale would have broken anyway but he’d have weakened more of our units if his luck hadn’t gone south.

We played 8 turns in 2 hours and 12 minutes, about 16.5 minutes per turn, counting photo time. Not bad for our second game and changing theaters of operation. We had some errors, of course. Not until late in the game did we check morale for the hit that made units weakened. We did check for hits taken after being already weakened. I don’t think it made a huge difference. I do wonder about a fairly fresh unit being assured of closing frontally against unsupported artillery. Perhaps if the guns get two hits the attacker should check morale. It also occurs to me that Indians should check morale when hit by artillery.

The French/Indians took 16 hits. The British took 39 hits, though I think 6 of those were disorder hits from units retreating through friends. I’m quite pleased that the game worked as well as it did. There will be some more French and Indian battles in our future.

Thursday, November 22, 2018

Monongahela 1755 scenario

All internet images removed from this post, sorry.

We tested this scenario on 11/29/2018. I didn't get around to posting the report until early December. It uses the work-in-progress Simple Seven Years War Rules by Keith Flint. Due to the reduced scale and the game being entirely in the woods, we used the original movement and ranges for 25mm figures even though we use 15mm figures.

Monongahela July 9, 1755

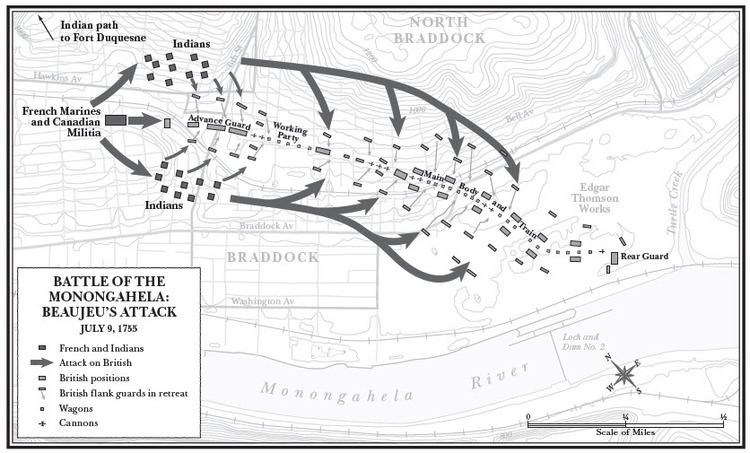
History: an expedition under Major General Braddock was sent to capture Fort Duquesne the year after young George Washington’s failed attempt sparked an undeclared war. Struggling with supply problems, the force advanced through the wilderness, cutting a path as it went. As the British neared the fort, the French and Indians sallied out to meet them. Both columns collided in the woods. Gage’s advance guard shot and killed French captain Beaujeu (who seems to have gone native); the Canadian militia recoiled at first. The Colony regulars (Troops de la Marine) engaged Gage’s troops while the Indians moved around both flanks. 

Braddock rushed his main body up to assist the advance guard but fell into disorder as Gage’s men retreated through them. The French and Indians closed in a semi-circle, firing from cover into the disorganized mass. Many accounts say that British troops fired on each other in the confusion. Officers went down one after the other. When Braddock was mortally wounded the troops began to give way. Then the Indians attacked with tomahawks. In the general collapse, Washington put together a small rearguard. The panic stricken survivors ran back to their camp and the large body of troops there were infected with panic and retreated. The fort would not be taken until the Forbes expedition of 1758. This battle is often described as an ambush, but it was a meeting engagement that went terribly wrong for the British.

A map here.

And my version of this on the table: 
                                        

and poorly focused:

French and Indians each unit = 150 troops or Indian warriors
6 units, breakpoint = 3


French

Captain Beaujeu C-in-C KIA

Troops de la Marine
1 light infantry unit
Canadian militia
1 light infantry unit (Beaujeu attached)
Indians

Ensign Langlade attached to Chippewa band

Chippewa
1 light infantry band (Langlade attached)
Huron
1 “ in command within 3” of commanded band
Chief Pontiac attached to Ottawa band

Ottawa           
1 light infantry band (Pontiac attached)
Delaware
1 “ in command within 3” of commanded band

British and Colonials each unit = 150 troops or 2 guns
11 units, breakpoint = 5, British -1 for initiative due to inexperience in wilderness combat 

Major General Braddock C-in-C KIA
Attached to 12 lb guns
Lt. Col. Gage WIA advance guard
Attached to one of the two units below
Grenadiers
1 line infantry unit, superior morale, melee
“Grenadiers”
1 line infantry unit
6 lb guns         
1 section independent
12 lb guns
1 section independent
Col. Halkett KIA
Attached to a 44th Foot unit
44th Foot
3 line infantry units
Lt. Col. Burton WIA
Attached to a 48th Foot unit
48th Foot
3 line infantry units
3 wagons
each wagon lost counts as a unit lost
Colonial (Provincial) infantry
1 line infantry unit, inferior morale, melee

Scenario rules: 

The British were cutting a trail. The trail negates terrain penalties for troops moving in column. Wagons (inferior in all respects) may move on this trail at infantry speed. They may not move off the trail. Wagons may not pass through other wagons. Wagons that are weakened, retreat or routed count against British break point as though they were a combat unit. Wagons may not fire or fight back in melee. If a wagon routs, the teamsters have cut the traces and ridden off with the horses, leaving the wagons to block the trail. Mark the wagons as burning and a unit lost. Same if wagons try to retreat through other wagons. Wagons are out of command unless attached to Braddock. Wagons need to be able to advance towards enemy to move at all, even to retreat.

French and Indians all count as superior moving through woods. The militia has inferior morale. Indians who are weakened (4+ hits) have inferior morale. Indian light infantry who are not weakened may charge weakened line infantry. Indians who take hits from artillery must check morale.

Except for the trail, all terrain is wooded and visibility and weapon range is restricted to 6”. One unit may fit on the hill. That unit gets +1 when firing. (Accounts mention the deadly fire from the hill)

Langlade may command Chippewa or Ottawa bands. Pontiac may command the Ottawa band. Other Indians within 3” of a commanded band count as in command control. They may only be rallied by Beaujeu.

All officers must be attached to a unit, due to the small scale of the game, the restrictive terrain and the high mortality rate among officers in this fight. If an officer is badly wounded or worse, the attached unit must check morale with a -1 modifier. Officers who are wounded badly (or worse) are not replaced, with the exception of Braddock. If Braddock is badly wounded or worse, he will be replaced after a turn by Washington, who is bullet-proof. If hit, his horse is hit instead and Washington will be out for a turn while another mount is found. (He was never hit during this war or the next, and he was shot at plenty of times.) Officers (and chiefs) on foot treat horse shot as aide is hit instead, same procedure.

Edit: checked my map, moved the hill a little closer to the trail. Too lazy to go back and redo the photos.

Friday, November 3, 2017

More Muskets & Tomahawks

Thursday evening we played a 400 point game of Musket & Tomahawk with our 15mm figures. I had just completed a scratch-built longhouse in case the Indians should have to defend their village. Needless to say that was the scenario we rolled up. I could have used more. I also just got some Blue Moon Indian villagers in the mail and they are next in the painting queue, so we used a mix of solo Indian warriors and settlers to represent the villagers.

Jay had designed a British mixed force of 399 points; 1 light infantry officer with a rifle, 6 light infantry, 9 regulars, two units of 9 provincials each, 2 units of 6 rangers each and a 6 warrior group of mission Indians, for a total of 52 figures. I was tempted to field an entirely Indian force but since my Troops de la Marine hadn’t been on the table since 2012, I fielded the following force for 400 points: 9 Canadian militia, 12 Troops de la Marine with one Marine officer, 4 groups of Huron Indians, each 6 strong and 1 chief with a talent (guerilla, which was never used) for a total of 47 figures.

After laying out the terrain we rolled for objectives. The British force was set on slaughtering the Indian villagers. We rolled a raid which was then modified per the rules to scouting. We also acquired 40 points of villagers (8 figures) which were placed on the fields around the village. I swapped the stone farm house out for the lone longhouse.
We left the fences up around the fields. It didn’t occur to me until the today to wonder if the Indians used fences. I know larger villages had palisades, but that’s not the same thing.

Jay commanded the British regulars, light infantry (taken as irregulars) and Provincials with Rick leading the Rangers and Indians on the British right. I had the chief and three groups of warriors on our left. Ken, arriving late, got one group of warriors in the center and Bill had the Canadian militia and Troops de la Marine (taken as regulars) on our right. The British started out 8” onto the table while we arrived from the table edge. The first turn saw a run of British cards early on. The light infantry sprinted forward and dropped two villagers in the field with a musket volley. The civilians miraculously passed their morale test. Had they fled the table (1 in 6 chances); the British victory conditions would have been met. In the second half of the turn our cards finally started coming up and I flanked the British right. My first shots were a waste of powder, with a few possible hits that didn’t convert to kills. The turn ended before all of our cards were drawn.

The second turn saw a run of our cards. I kept shooting at the British and my dice came back from the dead. In the picture below the British Rangers are hidden by the trees, proof of their superior wood crafts. Or they recoiled out of camera range.
The Rangers recoiled into the open and fired back, bring a warrior down, forcing my left flank group to recoil in their turn.
On the other flank, the Canadian militia shot two light infantrymen; the rest recoiled, leaving the lieutenant alone. A volley from the Troops de la Marine riddled the red-coated officer and down he went. The “Forward Boys” card was removed from the deck. The regulars and Provincials moved up, thirsting for revenge while the villagers sought cover behind the Troops de la Marine. The Rangers reloaded. The Mission Indians poured fire into Ken’s warriors and put them to flight. Ken’s lads recovered at the end of the turn. The Mission Indians were then hit by fire from the Troops de la Marine and recoiled.

The third turn saw our Indian cards pop up first and the Rangers were cut down in the open.

I had 18 figures (counting the chief) on the open British right flank. The British team decided to finish the turn but things were looking bad for them. The Hurons put the Mission Indians to flight. Ken’s warriors returned to their place in the line and scored a long range hit against the Provincials. The British light infantry fired and nailed a Canadian, forcing his comrades to recoil from the fence.
The Brits threw in the towel, since they were highly unlikely to get the remaining villagers (their victory conditions) while we were very close to scouting the remaining sector of the table with our flanking move. British losses were 20 figures, including the officer while we had lost 8 figures (5 Indians, 1 Canadian, 2 villagers).

The game took less than 2 hours. We had a blast. Ken enjoyed his first game. We all noticed that the cards had a lot of effect on the game, likely more so than the dice. Getting a run of cards while your opponent doesn’t makes you feel like a genius, while the reverse makes you feel like the most plodding officer seen in any film. There will be more of this played. Unfortunately for the other Fencibles, this means they will have to hear more of my lousy Magua impersonations. Between the unusual turn structure and how much fun I was having, there are way less pictures taken than usual. Most of the above were taken after the game was well over.

I have to finish painting my last pack of 1877 Turkish cavalry. Then I can start on the Blue Moon Indian villagers, settler militia, dead and wounded, and make some more Indian structures.


I’m off to Maine with my wife for a while. After Thanksgiving we have Chickamauga (via the Bloody Big Battles rules) on tap.  

Friday, October 20, 2017

Sticky Bottom, Muskets & Tomahawks AAR

We played a couple games of Muskets and Mohawks last night. Both games were 200 points per side played with our 15mm figures mounted 3 infantry per base. The first game saw me lead the reserve squad of British regulars while Bill was Lt. Foghorn, with a squad of Provincials and a team of Rangers. The British were tasked with defending the homes of the locals at the hamlet of Sticky Bottom.
The perfidious French & Indians were led by Rick as Chief Lisping Turtle with two teams of warriors and Jay leading a squad of backwoods Canadian militia. They were on an evil mission: slaughter the settlers of Sticky Bottom! Boo, hiss!
The Indians moved with incredible speed while the Civilian card didn’t come up in a timely fashion. This had unfortunate consequences, as seen below.
The photo below is mislabeled. The staff will have to be flogged. The bodies are those of Canadian militia. The Canadians fell back, then in time came forward and fired.
You will note that my 15mm houses do not have lift-off roofs. Oh well. Lisping Turtle urged his warriors forward on the En Avant/Forward Boys card, judiciously staying behind. Two tomahawks flew towards Lt. Foghorn. One bounced off his gorget! The other, unfortunately, cleft his skull. The Indians stopped around his corpse and had themselves a scalping party, also lifting the gorget. The regulars arrived on table.
The Rangers charged and were driven back by these Indians. The other team of warriors charged the lower house and cut their way in after stiff resistance by the civilians, whose survivors fled out the window. But the regular card came up and a wild bayonet and tomahawk fight ensued, with heavy losses on both sides. When it was over all of the warriors had been slain and the regulars held the house.
The Rangers now fired a deadly close range volley and brought down most warriors of the other team, the few survivors heading for the hills. Chief Lisping Turtle called it a day. Both sides had lost 50% of their starting forces. The Indians failed to wipe out the civilians and so didn’t make their victory conditions. The British didn’t protect half of their civilian charges – though at this moment I realize their victory conditions for this scenario were to protect the houses, so they might indeed have attained their victory conditions. This is the first time we have played these rules and of course we made some mistakes. Mainly, though, all enjoyed the game. Losses were some 12 French and Indians, and some 15 British and civilians. It had taken about 90 minutes so we switched sides.   

I was Chief Running Dog and Bill led the Canadian militia, looking to scout the hamlet of Sticky Bottom. Rick and Jay were ordered to protect the settlers. In keeping with our less sanguinary motives, we opted for a game of feint and movement.
I moved all my warriors to the edge of a copse and traded fire with the Provincials. Their fire was too hot for us. One team of warriors recoiled and the other fell back, considering that sector of the table scouted.
I began moving to the British right. The Rangers side stepped to parry that. The Canadians advanced into the gap to scout that sector but were unable to pull back again before the British turned and fired on them with effect. Meanwhile the civilians had run into the houses, covered by a shield of Provincials. The regulars now appeared and marched in a column past the wheat field. Running Dog and a team of warriors advanced against their rear at close range. Both sides waited to see if an Indian or regular card came up first; none did for a while. By the time an Indian card came up I had thought better of firing into the fresh regulars and instead took off. We fled the table, having made our victory conditions: scouting each sector of the table and having at least 1/3 of our troops left. But the British had made theirs also: at least half (in fact all) of their civilians safe. Sticky Bottom would continue to beckon to other settlers. We lost 3 Indians and 5 Canadians while British losses were 2 Rangers and 2 Provincials. This game took a little over an hour. Again, much fun was had by all. We are thinking about having a 400 point per side game next time. And perhaps remembering to roll dice for when the game ends… I don’t think we’re up to speed enough to have side plots yet. In this game the Indians feel very different than the regulars - a good thing.

Tuesday, October 3, 2017

Muskets and Tomahawks AAR

Back on September 7 I was treated to a game of Muskets & Tomahawks at the Metropolitan Wargamers in Brooklyn. (I then left town for a couple weeks, hence the delay in posting this.) This is a set of skirmish rules for the French & Indian War – and the American Revolution too. The Metro Wargamers have a basement in a Park Slope brownstone, with multiple wargame tables, not a few with board games on them, including an on-going strategic game of the Napoleonic Wars.

But I was there for tin soldier action, courtesy of the MW President, Kimber. He had set up the scenario and graciously gave me the rather numerous French & Indians, some 4 groups of Indians (6 each) and a 10 man unit of French Canadian militia. The Indians and French each had a leader. The British had an 8 man unit of armed civilians who’d apparently just finished loading a wagon with barrels of rum, the objective of this fight. Nearby was a 10 strong unit of Provincial troops. Unknown to me, a 6 strong unit of Rangers was to appear later in the game. The Provincials had a leader. All told that made 25 British colonists to 36 French and Indians. The two to one advantage in leaders would tell too.

Now for a short introduction to the rules; activation for both sides is controlled by a single deck of (rather attractive) cards. Indians, for example, get 4 cards, each giving one action. Civilians/militia get 2 cards, 1 action each. Provincials get 2 cards. One has 2 actions, the other has 1. If regulars are present they two cards, each with 2 actions. Leaders each get 1 card. When drawn, the leader can give a subordinate unit within range an extra action. Event cards are also in the deck; when all three have been drawn, the turn is over and the deck is reshuffled. Firing is one die per firing figure, hits always on the same number. There is a second roll to convert hits to an actual casualty and this roll is modified by cover, range, type of target, etc. Once a unit loses a figure it must check morale. The result varies from carry on to recoil to flight (out of action until the end of the turn) to rout (out of the game). There’s more to it than that but you get the idea. The size of the units is also a clue to their staying power. Larger units hang around longer. The game lasts for 6 turns. A lot can happen in a single turn. 

And back to the game. The civilians noticed Indians approaching and opened fire, bringing one down. (Looking at the photos after coming back to town, I decided to name the tribes and leaders.) An Abnaki warrior went down but high dice and the cover of the woods kept them carrying on and they returned the fire. On my left, the Micmacs ran in single file to flank the civilians, with Bear Claw urging them on. On my right, the militia moved to flank the rum runners urged on by Lieutenant Legrand. My dice ran hot and cold, but Kimber’s dice mostly ran cold.

Concentrated musket fire told on the laborers. After most of them had been shot, the survivors took to their heels. In truth they had stood up longer than I would have.


And now a poorly focused picture of my left flank:
Now the Rangers arrived from the side table edge – decided by a die roll. They arrived behind the Abnakis. In the excitement I failed to get any pictures of it. They closed with the leading Abnaki group and set to with their tomahawks. They had two to one odds against two warriors and one on one against Bear Claw. My dice were pretty hot, nailing two rangers. The rangers only brought down two warriors. Bear Claw was spared, I suspect more by Kimber’s generosity than by the rules. A tie resulted which means a second round is fought immediately – good thing, I heartily dislike melees that last more than one turn. On the second round Bear Claw knocked a ranger on the head and survived. Having lost more troops in the fight, the surviving rangers recoiled. Kimber’s dice were cold and mine were hot, so the rangers were defeated. I do think that a surprise attack like this should get some additional bonus. I really expected at least one group of Abnakis to be defeated.

My musket fire continued to tell on the Provincials as the British side went below 50% effectives. An army morale card was added to the deck. Whenever it was drawn every British/colonial unit had to check morale. I now realized how fast the Indians could move and the Micmacs began a rapid move around the British left flank. I offered to end Kimber’s misery but he opted for one more turn. Some of his Provincials ran into the house while others were still out in the open. As the fourth turn came to an end, it looked like curtains for the Brits.
We ended the game. I like these rules. They are fairly simple but give a good period flavor. The Indians feel very different that the militia and regulars. I shall have to get a set of the rules. With minor tweaks because our 15mm figures are mounted 3 to a base, we can play this at our local club meetings. Since the card decks are sold out, I’ll have to make cardboard counters that we draw out of a cup, no big deal. I do intend to wander by the Metropolitan Wargamers again. This has inspired me to start painting up a small group of Conquest Miniatures Iroquois warriors that have been laying around after being primed for a year or more..