Friday, July 28, 2017

Crimean War battle, Turks and Russians only

Last night we played the Crimean War scenario of Kurudere, a Russia vs. Turk scenario set in the Caucasus in August 4, 1854. Warning: we don’t have any of the correct figures for this but other BBB guys say the game is a blast. We substituted Blucher’s Prussians for Russians and 1870 French for Turks. If that truly offends you, please avert your eyes now. If you can stomach that, read on. The game was a hoot and will deserve repeat attention from us in the future.

Jay decided to play the Ottoman leader Mustafa Zarif Pasha, seconded by Ken. I played Russian leader Prince Bebutov. The Russian force is small and quite good. The Turkish host is rather bad but numerous. Nearly half of the Turkish force arrives between turn 2 and 4, depending on the dice. The Russians need 4 objectives for a victory. They start with 3. I needed to clear the Turks off the highest Karayal plateau for a win and then get back in time to keep the 2nd Division from taking the objectives I started with.


The Turks stepped off crisply, even though they are all rated passive. My lads moved at a moderate pace. Early shooting showed low dice for the Russians. This would continue until halfway through the game. My assault dice would be moderate to hot. The bayonet is a good boy when wielded in deep formation. But the 36-gun Turkish battery on the hill would break up my early bayonet attacks.
Flanking fire by the smartly moving Turkish infantry would halt more and cause serious losses. Who knew they could maneuver so well?

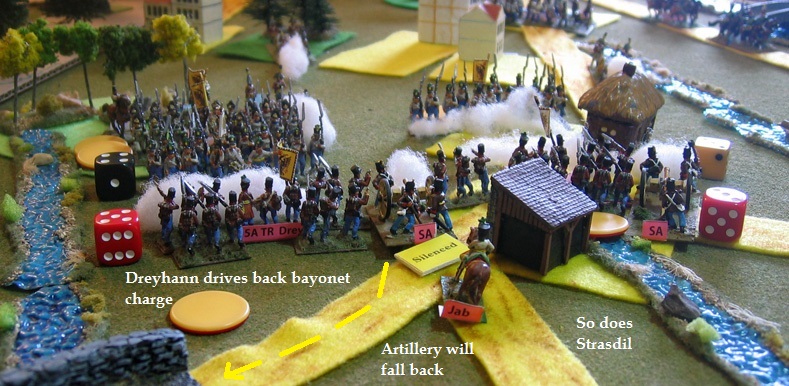
The Erivanski Grenadiers used cold steel to good effect.

Some of the Turkish Reserve escaped the wrath of Erivanski.
Back at the Karaval plateau, things went from bad to worse. My infantry had to pull back to refit, beyond the long range of the Istanbul Rifles. The Belevski Regiment was on life-support.


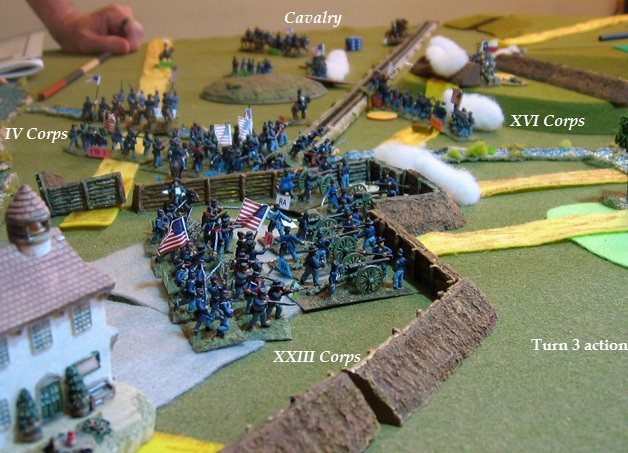
Following label is wrong: this is the Russian right flank.


My fire dice lit up.
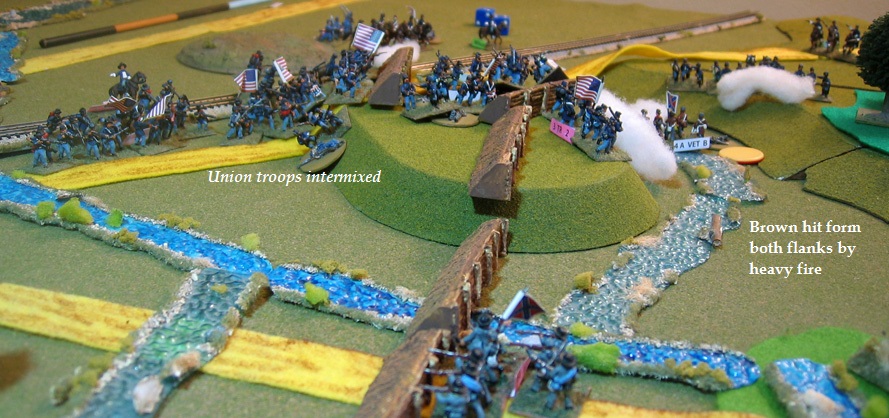
And on my left:


On the Russian left:

On the last turn, the Turks failed to take any of the 3 objectives I held during their half of the turn. We decided to only play my left flank, where I had a wisp of a chance of taking the Karaval plateau and gaining a win. It seems the valiant Erivanski Grenadiers were exhausted after winning 5 assaults.
And here’s the game end situation. Off-camera to the top, the small Dragoon regiment is threatening the Turkish rear. Earlier they won 2 assaults.
We played 8 turns in 3 hours and 30 minutes. Russian losses were 6 infantry stands (of 27) and 1 cavalry (of 14), about historical losses. The Turks lost 10 infantry and 4 more fled (of 47), 9 cavalry and 3 fled (of 14) and 2 guns (of 6). Turkish losses were less than the historical casualties. But then the Russians won the real thing.

After playing numerous games with rifled artillery or better, I was looking down my nose at smooth-bore artillery. Well, at effective range they can be quite deadly when they are massed. They broke up my early attack on the left and kept giving me trouble during most of the game, ceasing briefly when they wheeled around to face the Dragoons dancing behind them. I ended up making my final attack with the weakest elements of my force, Cossacks and Muslim Irregular horse. Those are the folks who should have been raiding behind enemy lines. That said, it was great fun having the Grenadiers smash through the Turkish Reserve. I would love to play this again some time, either as the Russian or commanding that big, crappy mob of Turks.


Fatigue has set in and we’ll be playing games every other week for a while, rather than weekly.

Friday, July 14, 2017

Nashville 1864

Hood’s army has been on half rations, dug in on the cold hills overlooking Nashville for nearly two weeks, waiting for a miracle to deliver the city to this ragged, outnumbered force. Instead, on December 15, 1864 Thomas’ blue-coated legions begin marching out of their fortified lines to attack the Confederates. This is not quite what Hood was hoping for.

We played this scenario Thursday, using the Bloody Big Battles rules. The notes said the Confederate CO might need some Southern Comfort to calm his nerves. I preferred a glass of Jameson’s and took command of the soon-to-be Lost Cause. The victory conditions make it hard for the Union to claim a win, although the Confederate “victory” conditions would mean a slower paced retreat, rather than the stampede that ended the actual battle. Either way, Hood’s army will fall back, barring a miracle. Union units/commanders hereafter and in photos are in italic.

Bill played Thomas and Rick played cavalry CO Wilson. I played Hood while Ken played Cheatham and SD Lee. Bill lobbied for some spirits too. I caved and poured him a Calvados. The wisdom of this will be discussed anon.

This is the scenario map showing objectives.
And my less than stellar rendering of it on the table:
The Union started with a major threat to our right flank.


More Union troops poured out of Nashville.


And here my troubles began.


Not seen in the photos, French’s division is pulled out of Redoubts 4&5 on the extreme left and sent over to the crumbling right. The move was completed under cover of night.
A new line was set up with most units entrenching. There was a considerable hole in the left center. Soon the Union host was on us again.
Bill graciously reminded me that I had forgotten Rucker’s cavalry unit on the extreme left. They began marching to rejoin the rest of the army. We rolled for a 50/50 chance to receive Forrest’s two cavalry divisions behind enemy lines. As in the actual battle, they didn’t show.


Things really heated up.


Not shown in the photos, Kimball’s division of IV Corps broke clean through the hole in our left center, shot Hood and seized the Granny Smith Pike objective on the last turn of the game. It was the only objective taken by the Union, who needed 6 for a win. Of course, this Confederate “win” was in scenario terms only. The tattered remains of the Army of Tennessee would have to fall back during the night. The Yankees would be too battered to pursue closely, especially since Wilson’s Cavalry had taken heavy losses. Hood was moderately wounded but died of the infection that set in after the bullet was removed. This would save a lot of ink in post-war arguments with Joe Johnston and others.

We played 10 game turns and one night turn in slightly less than 4 hours, 30 minutes. This argues against us having distilled spirits around the game table again. I do think some errors were made that can be attributed to elevated spirits, pun intended.
Confederate losses were 6 infantry stands, with 2 run off and 1 artillery stand. Union losses were 10 infantry/dismounted cavalry and 1 cavalry run off.


The Union flanking move on the first day was very successful, unhinging our line and virtually destroying Cheatham’s Corps. But then it came on frontally against our new line. I think that had they also threatened our left and forced us to stretch our lines, they would have done better. The hole in our left center was exploited too late, by too few troops. I wouldn’t mind playing this again from the Union side but no one seemed interested. I’m out of town next week so no game. We’ll see what transpires later in July.

Friday, July 7, 2017

Nagy-Sallo 1849 redux

We reprised the Hungarian-Austrian battle of Nagy-Sallo again since I didn’t have time to take it down from last week. I switched sides and played the Austrians, with help from Rick who played Austrian last week. Bill switched to Hungarian, aided by Ken who missed last week’s session. The rules are Bloody Big Battles as usual.

The Hungarians (in italics hereafter and in photos) must push through the Austrians to raise the siege of a fortress. Both sides can receive reinforcements based on die rolls from turn 3 on. The field is muddy; this counts as difficult terrain for horse and guns, and cuts artillery fire by half.

Uniform heresy alert: figures used are either from my Austrian Napoleonic force or my 1866 Austrians. There’s also a ridge on the field cut from cardboard. If that doesn’t throw you, please continue.

Strasdil’s Austrians are holding the village of Nagy-Sallo, one of the five objectives. The Hungarians need 3 for a tie, more for a win. They hold one at start. Nagy-Sallo has an additional feature: whoever holds it from turn 3 on gets a bonus to their die roll for reinforcements.
Turn1 saw bayonet charges. My anemic fire dice failed to stop any charges but the troops saw off both charges anyway. The bayonet is a good boy. Most of the game saw lousy fire dice by the Austrians but sturdy assault dice.
Hungarian fire was more effective, but not murderous.
Then the Hungarians captured Nagy-Sallo.


Both Austrian units rallied and attacked with success.

This set up another hard blow, flanking the lead Hungarian unit and then exploiting into their guns.
A counter-stroke made some trouble.
But the Hungarian brigade was weak and isolated.
We had a brigade arrive behind the enemy right flank. This would prove critical.
Herzinger’s brigade had been moving up slowly when moving at all (lousy movement dice). It suddenly moved at full speed and caught the enemy artillery from behind while the reinforcements struck the supporting infantry in front. The artillery rolled a six against Herzinger’s measly one. The artillery was in such a bad situation that only produced a tie. The artillery evaporated while Herzinger lost a base. The reinforcements routed Leiningen’s shot-up brigade. It was a disaster for the Hungarians.
Hungarian reinforcements arrived from the east and fired into the battle around Nagy-Sallo.  
Adding to their woes, Hungarian fire dice went cold.


It’s not clear from this photo, but Herzinger and Teuchert (the reinforcing brigade) heavily defeated the shot-up Hungarians in front of them and exploited into the artillery, which limbered up and galloped down the road. It didn’t affect any objectives but was a final slap to the Hungarians
The game ended with the Hungarians holding two objectives for a defeat. We had played 8 turns in a little under 3 hours. It was time for dinner.

Austrian losses were 3 stands of infantry and 1 artillery. Hungarian losses were 7 stands of infantry with 2 more run off and 2 artillery. There were a lot of assaults. One enemy loss was caused by distant fire as far as I recall. It was an interesting game. Had the artillery been at full force I’m sure the story would have been different.


Next week we're hoping to play an ACW battle. Stay tuned.