Thursday, November 22, 2018

Monongahela 1755 scenario

We tested this scenario on 11/29/2018. I didn't get around to posting the report until early December. It uses the work-in-progress Simple Seven Years War Rules by Keith Flint. Due to the reduced scale and the game being entirely in the woods, we used the original movement and ranges for 25mm figures even though we use 15mm figures.

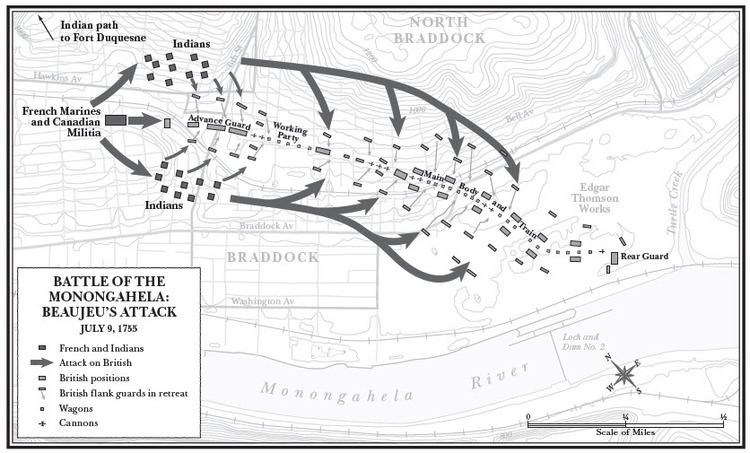
Monongahela July 9, 1755

History: an expedition under Major General Braddock was sent to capture Fort Duquesne the year after young George Washington’s failed attempt sparked an undeclared war. Struggling with supply problems, the force advanced through the wilderness, cutting a path as it went. As the British neared the fort, the French and Indians sallied out to meet them. Both columns collided in the woods. Gage’s advance guard shot and killed French captain Beaujeu (who seems to have gone native); the Canadian militia recoiled at first. The Colony regulars (Troops de la Marine) engaged Gage’s troops while the Indians moved around both flanks. 

Braddock rushed his main body up to assist the advance guard but fell into disorder as Gage’s men retreated through them. The French and Indians closed in a semi-circle, firing from cover into the disorganized mass. Many accounts say that British troops fired on each other in the confusion. Officers went down one after the other. When Braddock was mortally wounded the troops began to give way. Then the Indians attacked with tomahawks. In the general collapse, Washington put together a small rearguard. The panic stricken survivors ran back to their camp and the large body of troops there were infected with panic and retreated. The fort would not be taken until the Forbes expedition of 1758. This battle is often described as an ambush, but it was a meeting engagement that went terribly wrong for the British.

And my version of this on the table: 

and poorly focused:

French and Indians each unit = 150 troops or Indian warriors
6 units, breakpoint = 3


French

Captain Beaujeu C-in-C KIA

Troops de la Marine
1 light infantry unit
Canadian militia
1 light infantry unit (Beaujeu attached)
Indians

Ensign Langlade attached to Chippewa band

Chippewa
1 light infantry band (Langlade attached)
Huron
1 “ in command within 3” of commanded band
Chief Pontiac attached to Ottawa band

Ottawa           
1 light infantry band (Pontiac attached)
Delaware
1 “ in command within 3” of commanded band

British and Colonials each unit = 150 troops or 2 guns
11 units, breakpoint = 5, British -1 for initiative due to inexperience in wilderness combat 

Major General Braddock C-in-C KIA
Attached to 12 lb guns
Lt. Col. Gage WIA advance guard
Attached to one of the two units below
Grenadiers
1 line infantry unit, superior morale, melee
“Grenadiers”
1 line infantry unit
6 lb guns         
1 section independent
12 lb guns
1 section independent
Col. Halkett KIA
Attached to a 44th Foot unit
44th Foot
3 line infantry units
Lt. Col. Burton WIA
Attached to a 48th Foot unit
48th Foot
3 line infantry units
3 wagons
each wagon lost counts as a unit lost
Colonial (Provincial) infantry
1 line infantry unit, inferior morale, melee

Scenario rules: 

The British were cutting a trail. The trail negates terrain penalties for troops moving in column. Wagons (inferior in all respects) may move on this trail at infantry speed. They may not move off the trail. Wagons may not pass through other wagons. Wagons that are weakened, retreat or routed count against British break point as though they were a combat unit. Wagons may not fire or fight back in melee. If a wagon routs, the teamsters have cut the traces and ridden off with the horses, leaving the wagons to block the trail. Mark the wagons as burning and a unit lost. Same if wagons try to retreat through other wagons. Wagons are out of command unless attached to Braddock. Wagons need to be able to advance towards enemy to move at all, even to retreat.

French and Indians all count as superior moving through woods. The militia has inferior morale. Indians who are weakened (4+ hits) have inferior morale. Indian light infantry who are not weakened may charge weakened line infantry. Indians who take hits from artillery must check morale.

Except for the trail, all terrain is wooded and visibility and weapon range is restricted to 6”. One unit may fit on the hill. That unit gets +1 when firing. (Accounts mention the deadly fire from the hill)

Langlade may command Chippewa or Ottawa bands. Pontiac may command the Ottawa band. Other Indians within 3” of a commanded band count as in command control. They may only be rallied by Beaujeu.

All officers must be attached to a unit, due to the small scale of the game, the restrictive terrain and the high mortality rate among officers in this fight. If an officer is badly wounded or worse, the attached unit must check morale with a -1 modifier. Officers who are wounded badly (or worse) are not replaced, with the exception of Braddock. If Braddock is badly wounded or worse, he will be replaced after a turn by Washington, who is bullet-proof. If hit, his horse is hit instead and Washington will be out for a turn while another mount is found. (He was never hit during this war or the next, and he was shot at plenty of times.) Officers (and chiefs) on foot treat horse shot as aide is hit instead, same procedure.

Edit: checked my map, moved the hill a little closer to the trail. Too lazy to go back and redo the photos.

Friday, November 9, 2018

Lutzingen, Seven Years War action


Last evening we played a hypothetical scenario “Lutzingen” designed by Keith Flint, author of “Honours of War”. The rules used were his new work in progress, Simple Seven Years War Rules, along with our 15mm figures. Table size and all other distances were scaled down by 1/3. We used our house rules for leader casualties (moot since there were none). Ken (later aided by Jay and then replaced by Andrew) commanded the attacking Prussians and Rick commanded the defending Austrians. I umpired. (Austrians and Bavarians will be in italics here and in photos.) We didn’t use any national modifiers since this was our first try with the rules and we wanted to keep it simple.

This obscure battle featured small forces (under 10,000 each) led by commanders of the first rank; King Frederick II (the Great) and Marshal Daun. The Prussians made a forced march around the Austrian left and headed for the enemy depot at Lutzingen. Daun moved to stop this attack. (In lieu of a curtain, each side was given a map and drew their deployment.) The collision occurred at the cross roads south of the depot. The row of trees along the road, the plowed fields and the white fences have no tactical significance and are only window dressing. The bright yellow strips (without brown markings) are the edge of the playing area. Abandon hope of rallying, all units that enter this. Hits are indicated by cardboard markers, red discs indicate weakened status and yellow markers indicate retreating units. Cotton smoke shows units that have fired. The large white polyhedral die was used to indicate what turn was being played.

Both sides deployed evenly across the front.
The Prussians advanced, cavalry moving ahead on both flanks.

The Prussian Dragoon Brigade cannot be seen but they are working their way through the woods on the right.
On the 2nd turn things heated up. We decided that pass-through fire would be treated the same as firing in support of a charge; a 50% chance of the unit firing.


The third turn saw the Prussian Hussars in a pickle. The Austrian infantry had no pressure from the front and emerged from the woods behind them. On the Austrian right, the lack of a reserve was causing anxiety. I had made errors with firing modifiers in the the early turns and tried to recover from these.


The fourth turn saw the Hussars try to extricate themselves while the Dragoons began a romp past the enemy flank.


We broke for dinner.

Turn 5 saw mixed results for the Hussars. The Austrian cavalry charged with mixed results; a badly shot up Garde battalion ran through their supports, which then sent the cavalry about their business. A Dragoon regiment was beaten by a steady (and untouched) line battalion. We opted to have units winning the first round fight contacted supports in the second round rather than continue the melee into the next turn. A badly shot up Austrian battalion quit the field, without having run through any supports.


We had been counting weakened, retreating and routing units at the end of each turn. The 5th turn saw both armies with a lot of red and yellow markers. The Prussians had a total of 4 points, more than halfway towards their breakpoint, without a unit yet off the table. They were about to lose their first. But the Austrians were headed for trouble. Edit: just noticed that the Bavarians should not have been able to retire in good order, as they were rated inferior and such moves are beyond them, It didn't make that much difference considering what the next turn held for them.

I only got one picture of the 6th turn (taken the next morning). Perhaps the fine bottle of wine with dinner might account for the lack of vigilance by the photographer.

Unseen, the 2nd Battalion Moltke Regiment charged and beat a badly shot up Prussian battalion, advancing deep into the Prussian center without any support. But the Prussian Dragoons put the hammer down.
Austrian Hussars and both Bavarian battalions quit the field. The Hessen-Darmstadt Dragoons rallied on the edge of the table, narrowly avoiding the Austrian breakpoint (5.5 against the breakpoint of 6). We called the game at this point. The Austrians needed to rout three more Prussian units for a win, while avoiding having one more of their own units either get weakened or retreat. It seemed a forgone conclusion and the hour was getting late. So the game went to the Prussians, who sacked the depot and forced Daun to withdraw from the immediate area.

The Prussians had 1 unit routed off the table, one weakened and retreating, and 4 weakened for the equivalent of 4 units routed against their breakpoint of 7. The Austrians had 4 units routed off the table, 1 weakened and 2 Prussian units (the Dragoons) on objectives for the equivalent of 5.5 units routed against their breakpoint of 6, hovering on the precipice.

It took 3.5 hours for us to play 6 turns, about 35 minutes a turn. We proceeded at a leisurely pace and everyone was new to the rules. I’m sure this will go faster in a few tries. The game is good, simple without being simplistic. We did have to make some quick decisions mid-game but it is a work in progress.

Each turn initiative is determined and the side with initiative decides who goes first. The sequence is; first side moves, second side moves, second side fires, first side fires, melee, rally. It seems to me that unless you have an imperative reason to go first, going second is better. You can adjust to the other side’s moves and you get to fire first. This impression may change as we play more games. I do have some questions and suggestions for Keith that I’ll forward on his online forum. 

If everyone’s schedules agree we hope to have a game in later December. I intend to use the same rules transported across the pond for the battle of the Monongahela, better known as Braddock’s defeat. Break out the tomahawks and war paint.