Friday, August 25, 2017

Marengo BBB

The Fencibles played a first test of my Marengo scenario last night. This is the battle that gave rise to the dish Chicken Marengo but almost saw Bonaparte’s goose cooked 15 years early. 

Rick determined to play the Austrian Melas (in italics from here on and in the photos) and I took the part of First Consul Bonaparte. Ken, Bill and Jay were unable to attend so it was just the two of us. We got off to a late start, between shooting the bull about Melas and luck, or his lack of it. My wife Linda provided a small plastic chicken to grace the town of Marengo. She also cooked an excellent dinner featuring Chicken Marengo. In time we deployed and the Austrians attacked. When possible, I showed the assault dice of both sides. Units were often formed deep (2 ranks of stands) to get the +1 in 
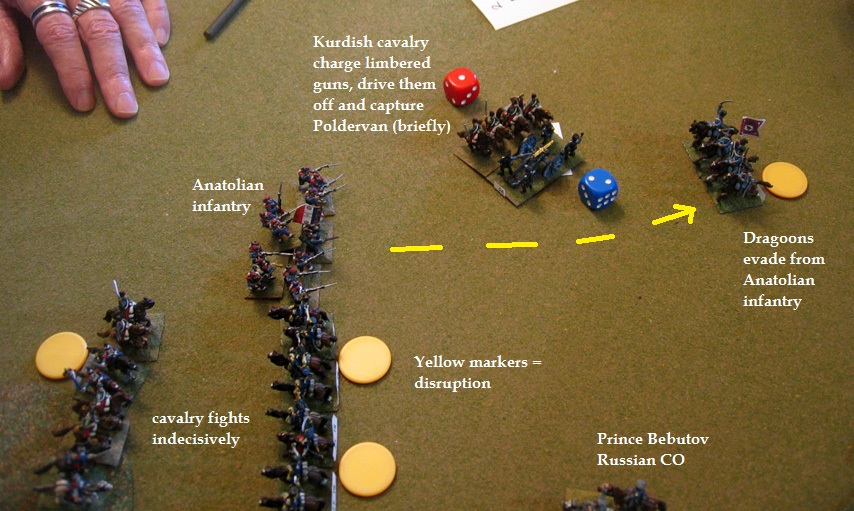
assault. Yellow discs show disruption, casualty figures show a stand removed. Uniforms are 1809 period for the Austrians, and anything from bicornes to Bardin for the French. I figure close enough is good enough. We agreed to give a +1 in assault if infantry and cavalry were combined and then promptly forgot about it. It would only have affected one assault as far as I recall.


And that was 2 turns of action, not unlike a barroom brawl. Both sides rolled fairly low firefight dice.


On the 4th turn the French began to fall back, though it wasn’t done flawlessly.
We broke for dinner, that excellent Chicken Marengo done in the style it was served on the battlefield that night, with egg and shrimp (in place of crawfish, so dear here in NYC). After dinner and conversation, we returned to the fray.

The arrival of Desaix’s troops caused the Austrians to halt in place and inspired the French to start their counterattack. I figured it was unlikely I could recapture Marengo but determined to cause crippling losses to the enemy.


Sometimes my aging camera fools me. I think it’s taking a photo but it just focuses. As a result I have no pictures of the final French turn, which saw a major collapse of the Austrians. Rick’s assault dice went cold as ice and the French romped over almost every attack made, exploiting on. Melas went down in the final scrum; post-game dice showed he had been badly bruised but was up on his feet again after a couple days in bed.

Victory conditions had 1 point each for control of Marengo, the cross roads near the east edge of the board, exiting unspent units off each side’s supply road, causing Bonaparte to be a casualty and causing twice as many losses as taken (including removed, run away, and leaders). The final score was Austria, 1 point for holding Marengo, French, 1 point for holding the crossroads and 1 point for inflicting twice as many losses.

French losses were 4 infantry stands removed, 3 cavalry (including all of Kellermann) and 1 run off for a total of 8 stands, perhaps 4,000 troops. Austrian losses were 15 infantry removed, 3 run off, 2 cavalry removed and 1 run off, and Melas down for a total of 22 stands, for a total of some 10,500 (2,000 of them would show up at the campfire in time). We played 9 turns in about 4 hours and 30 minutes, rather slow for us. There were constant charges except for the two turns that the French broke contact and retreated. It didn’t follow the actual battle all that closely except in the final regard: Austrian fortune deserted them at the end and they collapsed.

There are a couple very small (2 stand) Austrian light infantry units that I think would better be merged into larger units. Tiny infantry units (and tiny disrupted cavalry units) in the front line are pretty much disasters waiting to happen if the enemy have decent and sizeable units within striking distance. The demise of Kellermann’s brigade was a lesson. I’ll give the merging of the light infantry some thought. We may try this again in a couple weeks, depending on how many Fencibles can make it. If we instead need a small game, we could re-play the 1870 battle of Coulmiers with adjusted victory conditions. We’ll see.

Update: We will play Marengo again this coming Thursday, with the small change to the Austrian OB mentioned above. I will take the role of the septuagenarian Melas. 

Monday, August 14, 2017

Marengo mat, brand new

This is what we'll try on Thursday the 24th, Marengo. The paint is still wet on this canvas mat, 5 X 4 feet. I have some small details to add when it is dry.

The crossroads (perhaps better called a fork) is where Desaix put in the counter-attack that wrecked the hitherto victorious Austrians. I'm working with brigades as basic units, each base = 500 troops and 12 to 18 guns. The Austrians will use the 18 guns per base due to the small caliber of most of them (3 lb). Also most of them were battalion guns and so did not have the command structure to mass and move. That's my story and I'm sticking to it.

It will be a first test of my nascent scenario and we'll see if it needs work. The map is based on the detailed maps in the Osprey Marengo book by Hollins. I've played Marengo over the years with Volley & Bayonet and a since abandoned home-brew set, among others. Having a really detailed map makes a big difference - all the marsh and vineyards! I recall the first map I ever saw, in the West Point Atlas of Napoleonic Wars. It shows mostly open ground with a spurious ridge running down the center of the field.

Another look at the mat showed that I left off a few vineyards. Here is the mat after they have been added in, along with a few house, trees and troops in their approximate deployment areas.

I still have to read up some more on when different units reached the battle zone. Lannes may start in something other than road column, for instance.

Friday, August 11, 2017

Kurudere 1854, one more time (with feeling)

Last night the Corlears Hook Fencibles took a second try at the 1854 Crimean War battle of Kurudere using the Bloody Big Battles rules. Since we don’t have the right troops, Blucher’s Prussians stood in for the Russians while 1870 French played the part of Turks. Be warned, uniform heresy is revealed in the photos below. I led the Turks, aided by Rick while Jay led the Russians, aided by Ken. Rick missed the last session. Everyone else switched sides since then. The culprits can be seen below.
This battle in the Caucasus was fought between Russians and a large, poorly led Turkish army that was trying to raise the siege of Kars, a major fortress.

The situation started as a tie; each side needed to capture an objective (blue and red stars) for a win. The Turks moved first.

By the third turn Turkish artillery started to find the range and the Istanbul Rifles caused some damage to the Russians.
Russian light cavalry attacked the Rifles front and flank. The rifles emptied their cartridge boxes into the front group and routed them; then the flanking force rode them down. It was a short but brilliant fight.
Turkish reinforcements arrived and made life stressful for the Russians.

I figured the battered Tula Regiment was toast and charged. It seems the Turkish attack wasn’t very impressive (die roll 1) while the Russians fought like heroes (die roll 6). I was lucky my attack was only repulsed and not handled worse.

And then we seized an objective!
And what a charge the Redif made!


I figured the Russian flanking move around the Turkish right was toast. Again, I had not figured on the lackadaisical Turkish cavalry (rolled a 1) and the valiant Russians (rolled a 5).
Rick kept up the pressure on the Turkish left, hampered by crappy dice.

The caption below is wrong – the Turkish cavalry was defeated with loss.

The Turkish cavalry rallied and attacked, a mistake as it turned out.


The situation was still a tie as the Russians started their half of the last turn. There was a slim chance that the Belevski Regiment (disrupted, low on ammo and spent) might rout the equally beat up Arabistany unit in front of them that the Russians could take the Karaval plateau and win the game. When those tired worthies refused to charge we called the game a tie and stopped.

We played for 2 hours and 15 minutes before dinner, and slightly over an hour after for about 3 hours and 20 minutes. The game was a blast. I have ordered Rank & File 15mm Turks and hope that next time we play this they will be on the table instead of French. Do not hold your breath.

Turkish losses were 7 infantry with 1 ran off, and 5 cavalry with 2 ran off. The Russians lost 10 infantry stands with 1 ran off, and 6 cavalry with 4 ran off. It makes no difference in the game but we Turks consoled ourselves with having caused more Russian losses.


Next game will be in two weeks. We’ll see what ends up on the table.